Dummy Bank Combi tutorial
In this tutorial we’ll learn how to build a test model for a queue scheduling application for a bank.
We’ll be building a behavioral model of the SUT by using two of Provengo’s libraries - stateMachines and combi.
The tested site is available at Provengo Dummy Bank.
- When completing this tutorial you’ll know
-
-
How to create a behavioral model for the bank scheduler website.
-
How to use both libraries and how to combine them on the same project.
-
How to use the
Combilibrary to describe and determine the case parameters of the model. -
How to use the
StateMachineslibrary to create the main flow. -
How the choices made by
Combiconstrain the website’s flow.
-
-
How to use the created model to generate the test plan and visualize it.
-
How to add the automation layer to the model.
-
- This is useful because
-
-
More often than not, it is very convenient to describe each system aspect in the language most fit to describe it and then combine these descriptions.
-
The other option - coercing system description into a language that makes this description difficult - ends in code that’s hard to understand and maintain, and often also contains bugs
-
-
This is an example of a full real-world use case.
-
- Code Companion
-
https://github.com/Provengo/TutorialsCodeCompanion/tree/main/dummy-bank-combi
- Pre-Requisites
-
-
Open a new Provengo project, visit create new provengo project tutorial if you need help in creating a new project.
-
Get familiar with the tested site.
-
Project Overview
The tested site is available at Provengo Dummy Bank
This tutorial is divided to 6 main parts:
-
Preparing the workspace and setting up a new Provengo project.
-
Defining the case parameters using the combi library.
-
Defining the user flow using StateMachines library.
-
Connecting both parts and having the decisions made by combi constrain the user flow.
-
Adding the automation layer to the project.
-
Using the model we’ve just created to generate tests, execute them, view the results, etc…
We’ll be working with 3 main files in our spec/js folder:
-
case-params.js -
user-flow.states.js -
z-main.js
Prepare your workspace
The full source code for this tutorial is available at the github repository. You can either download it or follow this tutorial to build it step by step.
-
Create a new Provengo project:
provengo create dummy-bank-combi-
Open the project in your favorite editor
-
Find the
spec/jsfolder and delete thehello-world.jsfile. -
You can find data, x-paths, parameters etc.. in the
data\dats.jsfile. Feel free to add your own.
Let’s start with creating the file that handles the case parameters.
-
Create a new file under the
spec/jsfolder and call itcase-params.js.
case-params.js
In this file we’ll be using the Combi library to describe the specification parameters and the way they interact with each other.
Define the Combi object
// @provengo summon combi (1)

const bank = Combi("Dummy Bank"); (2)| 1 | To use the combi library, summon it at the beginning of the file. |
| 2 | Create a Combi object with the name Dummy Bank. We’ll be using it to describe the different options for each entity in the bank app. |
Add combi fields
Now let’s use some of the combi library functions to create the different fields and their values.
| Basically, we need a Combi field for each decision that should be made on the user flow. |
-
Use the
combi.field(name)method to create fields for both the service and the topic the user wants for his meeting.-
service - choose the desired service for the meeting - a banker, an investment specialist or a cashier.
-
topic - choose the desired topic for the meeting, each service has different topics.
-
-
Add values to each field with the
fld.isOneOf(v1,v2…/arr)function.
// define the service field and set it's different values.
const service = bank.field("service").isOneOf("Banker", "Cashier", "Investment Specialist");

// definde the topic field and set it's different values.
const topic = bank.field("topic").isOneOf(TOPICS);
Now the variable topic holds the full topics list. We need to limit thier values by the services.
Let’s define some fields dependencies by using the fld.whenSetTo(x).field(f2).mustBe(y) function.
This will connect the different services to their correlated topics.
(1)
service.whenSetTo("Banker")
      .field(topic).mustBe(MEETING_TYPE_2_TOPIC["meet_banker"]);
(2)
service.whenSetTo("Investment Specialist")
      .field(topic).mustBe(MEETING_TYPE_2_TOPIC["meet_invest"]);
(3)
service.whenSetTo("Cashier")
.field(topic).mustBe(MEETING_TYPE_2_TOPIC["meet_cashier"]);| 1 | Set the topic values for a meeting with a banker. |
| 2 | Set the topic values for meeting with an investment specialist. |
| 3 | Set the topic values for meeting with a cashier. |
|
You can find TOPICS, MEETING_TYPE_2_TOPIC in the |
-
Let’s add the fields we need for setting up the time for the meeting.
-
dayPart choose between morning and afternoon panels.
-
hour choose the desired hour according to the day part.
-
const dayPart = bank.field("dayPart").isOneOf(DAYPART);
const hour = bank.field("hour").isOneOf(HOURS);-
Use
fld.whenSetTo(x).field(f2).mustBe(y)again, to connect between dayparts and their correlated hours.
dayPart.whenSetTo("morning").field(hour).cannotBe(DAYPART_2_TIME["afternoon"]);
dayPart.whenSetTo("afternoon").field(hour).cannotBe(DAYPART_2_TIME["morning"]);-
Add a field to set the branch and it’s values.
-
branch choose a branch for the meeting.
-
const branch = bank.field("branch").isOneOf(REMOTE_BRANCHES);| When the selected service is either a banker or an investments specialist, the branch defaults to home branch. |
Let’s constrain the branch to be Home Branch when the chosen service is not Cashier.
service.whenSetTo("Banker").field(branch).mustBe("Home Branch");
service.whenSetTo("Investment Specialist").field(branch).mustBe("Home Branch");
Create a recordCombiValues function.
This function uses the record function to save the values that were chosen by Combi so we can use it later for automation.
function recordCombiValues() {
  hour.record();
  topic.record();
  branch.record();
  dayPart.record();
  service.record();
}
Add the below code to start the process of setting the combi parameters.
bank.doStart();And that’s it. we’re done with the file that handles case parameters.
Let’s make sure that everything is working properly.
Test Space
Go to your terminal and run the analyze sub-command to visualize the test space the combi has created.
provengo analyze -f pdf /dummy-bank-combi

# Replace `/dummy-bank-combi` with the path to your project.
⇒ You should get a new testSpace.pdf file under the products/run-source folder.
It should open automatically for you, and you should see something like this:
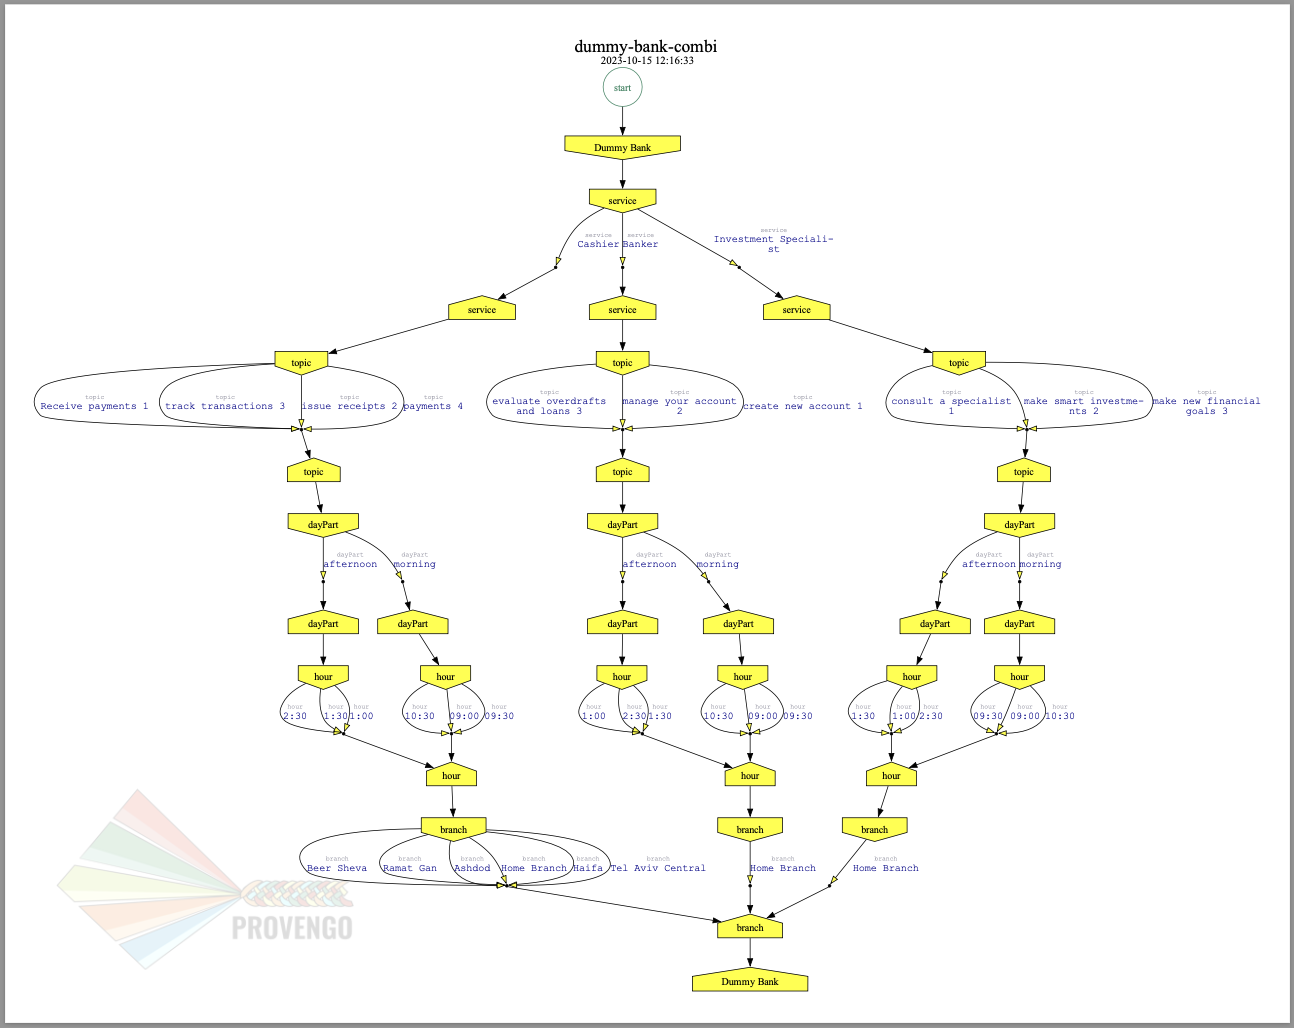
As you can see in the graph, each field we’ve created has 2 pentagons representing it; one is facing inwards and the other one outwards, symbolizing the start event and the end event respectively. In between the pentagons we can see the edges representing the different options that we earlier set to each field.
Define the user flow
Let’s move on to creating the file that handles the user flow.
In this file, or this part of the model, we’ll be using the StateMachines library to define a state machine that describes the user flow.
States and Transitions
First, let’s identify the different states and transitions of the bank scheduler app.
|
States represent the different screens or stages of the application. Transitions are the events or actions that cause the app to move from one state to another. |
Define the State Machine
Create a new file under the spec/js folder and call it user-flow.js.
// @provengo summon StateMachines (1)

const sm = new StateMachine("Dummy Bank Example",false); (2)| 1 | To use the StateMachines library, summon it at the beginning of the file |
| 2 | Define the state machine object, with the StateMachine(name, properties) function. Call it Dummy Bank Example and set the autoStart property to false. |
Connect The States
Use the function sm.connect(s1).to(s2) to create and connect the states to each other, according to the transitions we saw earlier.
By default, the first state defined through connect is the starting state. We need 2 starting points:
-
for the login state.
-
for the chooseTopic state to allow connecting the setTimeAndBranch state to the machine.
Use the sm.connect(s1).to(s2) to allow connecting multiple states to an existing one. |
sm.connect("login")
    .to("dashboard")
    .to("chooseService")
    .to("chooseTopic")
    .to("setTime")
    .to("contactInfo")
    .to("userConfirmation")
    .to("systemConfirmation");

sm.connect("chooseTopic")
    .to("setTimeAndBranch")
    .to("contactInfo");
Add constraints to the main flow
Next, we want the state machine to make the correct transitions according to the selected service. We’ll be using the constraints library to set these transitions.
|
To use the |
-
Let’s block the state machine from entering the
setTimeAndBranchstate when the selected service is either a banker or an investments specialist. -
Let’s block the state machine from entering the
setTimestate when the selected service is cashier.
Constraints.after(service.setToEvent("Banker"))
            .block(sm.enterEvent("setTimeAndBranch"))
            .until(sm.enterEvent("contactInfo"));

Constraints.after(service.setToEvent("Investment Specialist"))
            .block(sm.enterEvent("setTimeAndBranch"))
            .until(sm.enterEvent("contactInfo")); (1)

Constraints.after(service.setToEvent("Cashier"))
            .block(sm.enterEvent("setTime"))
.until(sm.enterEvent("contactInfo")); (2)-
Let’s add a function to get the state machine so it will be available from other files.
function getSm(){
    return sm;
}
Test Space
Let’s check out the test space that the state machine produces.
-
Change the
autoStartproperty of the state machine to true. -
Go to the
case-params.jsfile and delete the code that starts the combi. (Or just drag the file to the disabled folder.) -
Open your terminal and use the
analyzecommand.
provengo analyze -f pdf /dummy-bank-combi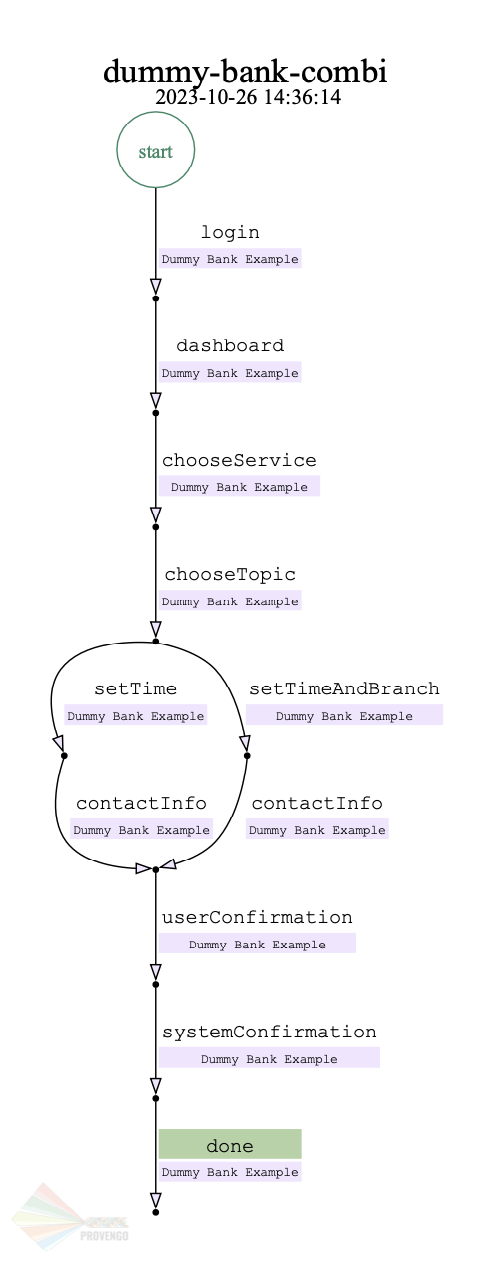
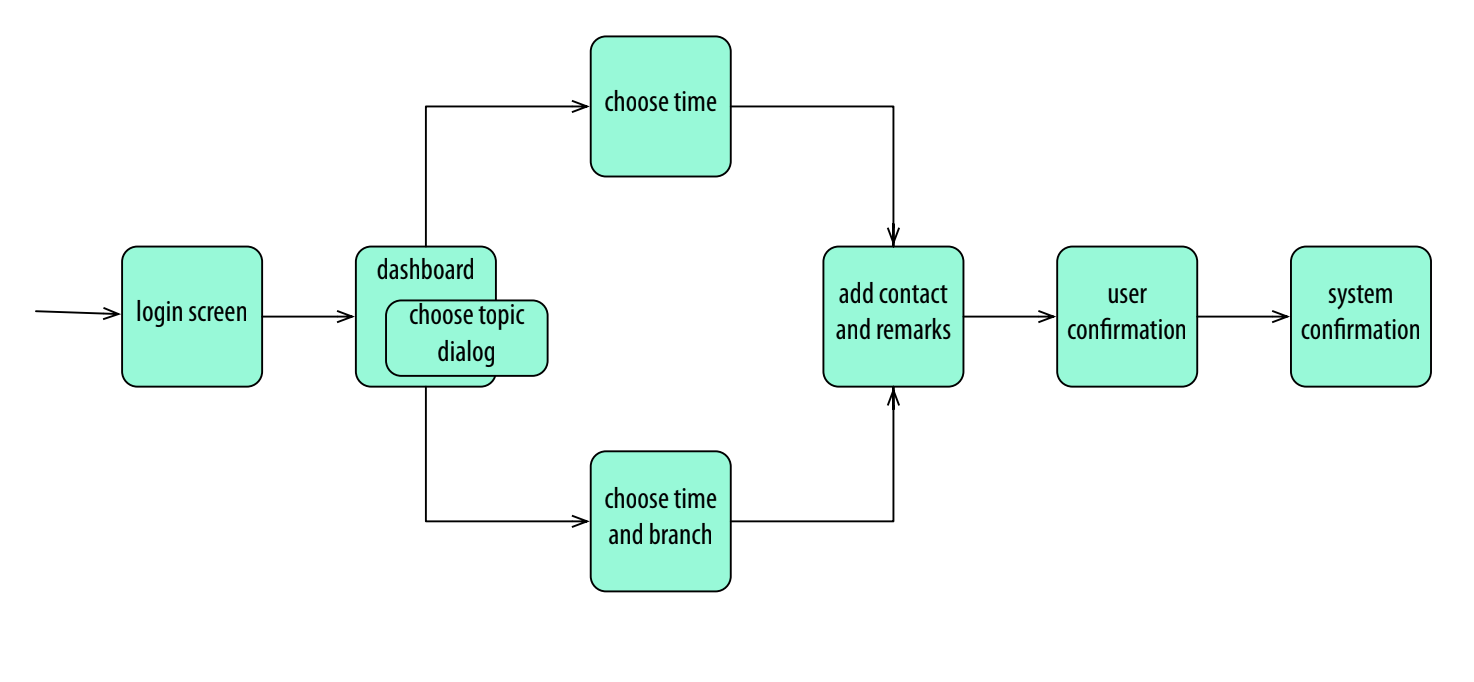
As we can see, the created graph describes the flow of the app. You can see how the code we wrote translates into the test space, showing all the available scripts and the splits created by the constraints.
Coordinate between parts of the model
Up to this point we have seen each part separately. Let’s move on to creating the code that coordinates between them.
Create a new file under the spec/js folder and call it z-main.js.
This file will include the main b-thread that is responsible for running the combi and state machine and to make them work together.
The files under the spec/js folder are being loaded by alphabetic order. We want the main file to be loaded last so we’ve prefixed it with a z-.
|
Create two constants to indicate whether to run the combi and state machine.
/**  Run the case parameters combi */
const RUN_COMBI = true;
/**  Run the state machine */
const RUN_SM    = true;
From now on we’ll be using these two constants to control the autoStart variables of both the combi and the state machine.
Go to the user-flow.js file and set the autoStart property of the stateMachine back to false.
|
Define the main b-thread
Let’s create the main b-thread. It will first run the combi to choose the case parameters, then it will run the state machine with the selected values.
bthread("main", function start() {
  if ( RUN_COMBI ){
    bank.doStart(); (1)
    waitFor(bank.doneEvent); (2)
  }
  if ( RUN_SM ) {
    const sm = getSm(); (3)
    sm.doStart(); (4)
  }
});| 1 | If the RUN_COMBI is set to true, start the process of setting the bank combi object parameters. |
| 2 | Wait until the combi arrives to the doneEvent and finishes. |
| 3 | if the RUN_SM is set to true, get the state machine by using the getSm() function we’ve created earlier in the user-flow.js file. |
| 4 | Start the state machine. |
The code above creates the behavior of the sealed fate pattern by first running the combi to select all the case parameters and only then running the state machine and having the selected values constraining the user flow.
Test Space
Let’s produce the test space again, this time, for the complete model.
provengo analyze -f pdf /dummy-bank-combi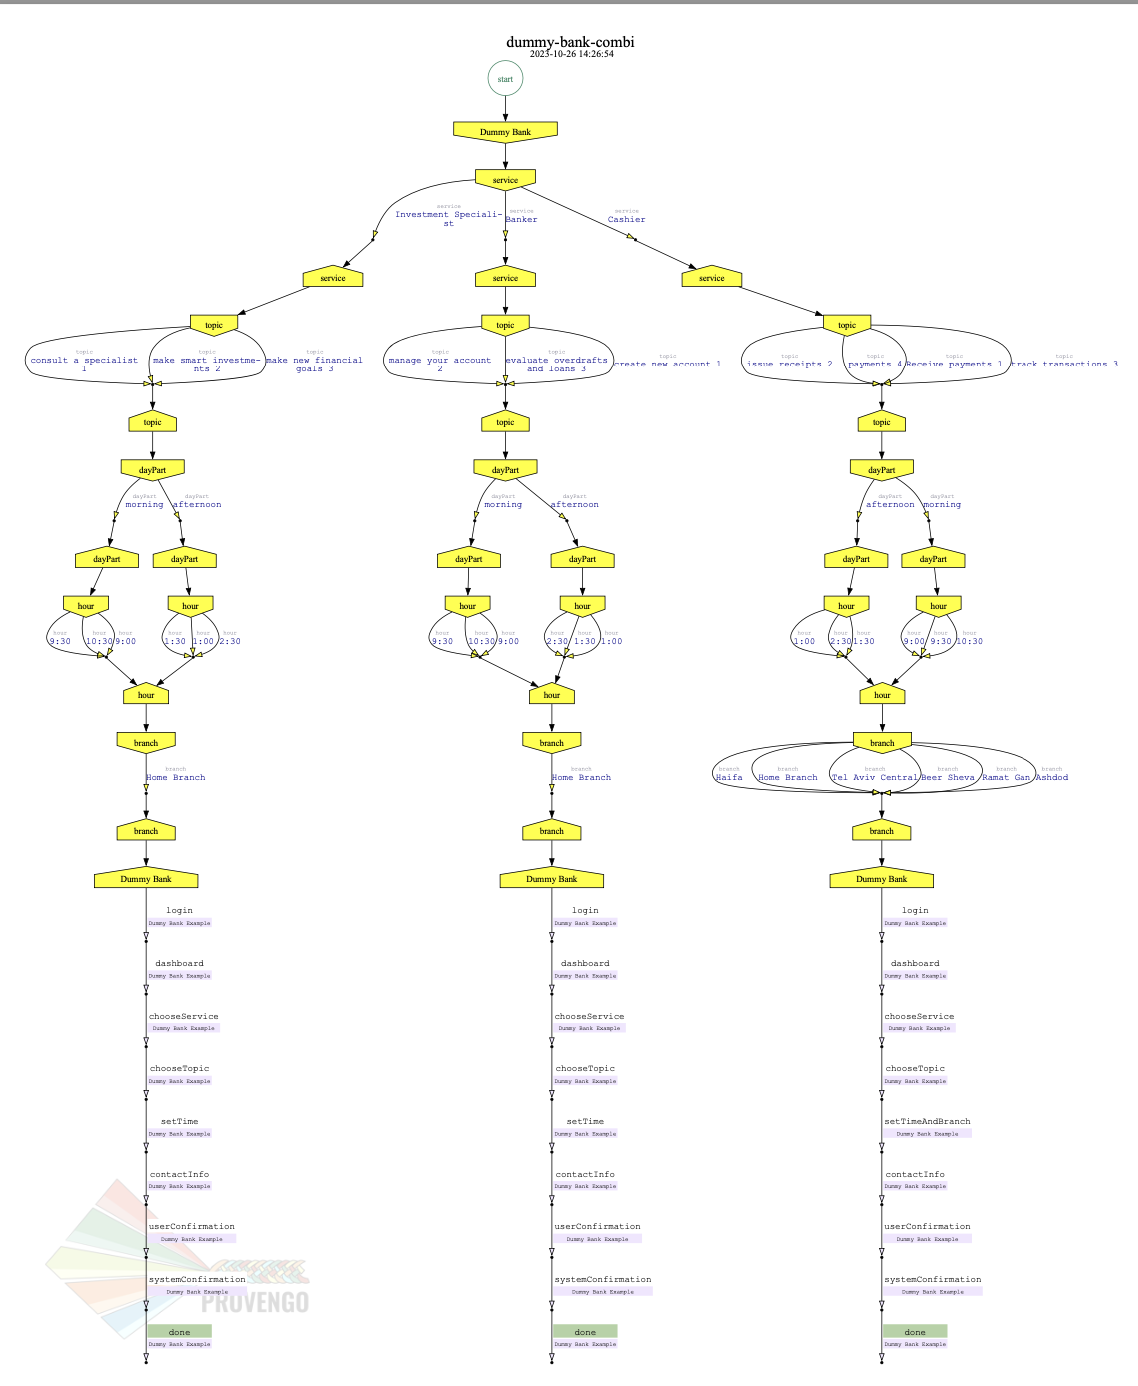 As you can see in the graph, the model first chooses the case parameters values. and only when the combi is done, it moves to the state machine, and continues linearly, no parameters are being selected in the process, decisions were already taken on the combi part of the model.
Automation
In this section, we will explain some of the automation process. For a full solution go to the companion repo.
|
Automation Setup
By default, Provengo uses Selenium Manager for browser automation. This normally works out of the box. In the unlikely case of technical issues, please consult the Selenium Library documentation on our site. |
To add automation to the process, create a new file under spec/js folder and call it z-low-level.js.
In this file we define the automation steps for each state of the state machine. We will first see how to connect the states to their related functions. Then, we will define the handlers and fill them with the steps we need for automating the dummy bank website.
We want this file to be loaded after the files that define the combi and the state machine, so we’ve prefixed it with the letter z-.
|
Get combi values
Let’s make sure that the values that were selected by combi will be available for the automation steps.
// @provengo summon selenium (1)

recordCombiValues(); (2)| 1 | To Use the Selenium library summon it at the beginning of the file. |
| 2 | Call the recordCombiValues function that we earlier defined on the case-params.js file. |
Link each state to its handler function
Next, we would like to link each state of the state machine to a function that handles it’s automation.
Use the function sm.at(stateName).run(handler). It will run the handler whenever it gets to the state stateName.
| You can find the available selenium functions in the documantaion. |
getSm().at("login").run(userLogin);
getSm().at("dashboard").run(dashboard);
getSm().at("chooseService").run(chooseService);
getSm().at("chooseTopic").run(chooseTopic);

getSm().at("setTime").run(setTime);
getSm().at("setTimeAndBranch").run(setTimeAndBranch);

getSm().at("contactInfo").run(contactInfo);
getSm().at("userConfirmation").run(userConfirmation);
getSm().at("systemConfirmation").run(systemConfirmation);
The state handler functions
Before we implement the handler functions, we need to define a new session.
const session = new SeleniumSession("session");Let’s add handlers for the login and the dashboard states.
function userLogin() {
  session.start(URL); (1)
  session.writeText(COMPONENTS.LOGIN.userName,  CUSTOMER_DETAILS.username); (2)
  session.writeText(COMPONENTS.LOGIN.password, CUSTOMER_DETAILS.password);
  session.click(COMPONENTS.LOGIN.submitButton); (3)
}

function dashboard() {
  session.waitForVisibility(COMPONENTS.dashboard, 1000); (4)
}| 1 | Start the session with the URL of the dummy bank app. |
| 2 | Enter credentials to login. |
| 3 | Click the login button. |
| 4 | Wait for the dashboard component to be visible. |
Now Let’s define the chooseService and chooseTopic handlers: After we’ve saved the combi values, let’s retrieve them into local variables for automating.
Variable names should be unique across the files of the project. A good practice will be to call the retrieved value of a field x ⇒ selectedX. [ See (2) below ]
|
function chooseService() {
  if (!bp.store.has(service.name)) { (1)
    return;
  }

  let selectedService = bp.store.get(service.name); (2)
  let button;

  if (selectedService == "Banker") { (3)
    button = COMPONENTS.SERVICES.meet_banker;
  } else if (selectedService == "Cashier") {
    button = COMPONENTS.SERVICES.meet_cashier;
  } else {
    button = COMPONENTS.SERVICES.meet_invest;
  }
  session.click(button); (4)
}

function chooseTopic() {
  let button;
  if (!bp.store.has(topic.name)) {
    return;
  }

  let selectedTopic = String(bp.store.get(topic.name)); (5)

  if (selectedTopic.includes("1")) { (6)
    button = COMPONENTS.TOPICS.topic_1;
  } else if (selectedTopic.includes("2")) {
    button = COMPONENTS.TOPICS.topic_2;
  } else if (selectedTopic.includes("3")) {
    button = COMPONENTS.TOPICS.topic_3;
  } else {
    button = COMPONENTS.TOPICS.topic_4;
  }

  session.click(button); (7)
}| 1 | Check if the service value exists. |
| 2 | Save it to a variable called selectedService |
| 3 | Change the button value according to the selectedService value. |
| 4 | Click the selected service button. |
| 5 | Cast the type of the retrieved value to a String, so you can use the String method includes() on it. |
| 6 | Let’s check what topic number button should be clicked. |
| 7 | Click the selected topic button. |
Continue adding the rest of the handlers on your own, or use the example solution to finish the automation.