Automations and Libraries
- When completing this tutorial
-
You will know how to automate a website using Provengo, how to use libraries, what are event sets and how to use them, and how to refine models so they become more detailed.
- This is useful because
-
Event sets and model refinement are powerful concepts for describing how system should and should not behave. Automation is useful for obvious reasons.
- Code Companion
-
https://github.com/Provengo/TutorialsCodeCompanion/tree/main/2-automations
- Pre-Requisites
-
-
First Steps with Provengo tutorial
-
We recommend going over this tutorial even if automation is not part of your role, as the techniques presented in this tutorial are useful in many other use-cases as well. We demonstrate them on automation here, but they are equally useful for manual testing and for general business modeling. If you do not wish to setup the automation layers, you can safely replace the Selenium-related events with basic events, such as Event("click button").
|
In this tutorial we will automate the morning routine simulator. We will do this by taking a model similar to the one developed in the previous tutorial, and refine it with automation events. To save some non-modeling work (such as creating element identifiers) and to demonstrate how an automation project might be organized, we have created a starting point project in this tutorial’s code companion. We recommend using that project as a starting point. The companion also has a sample solution you can use as a reference. That solution is just a suggestion though - you might come up with another solution that is just as valid (or even better than ours!).
| This tutorial is organized as follows: First we’ll learn a bit more about events. Then we’ll look at event sets, an then move to automations and model refinements. |
Meet the Starting Point
Open the starting point project using your favorite text editor' and let’s take a look at the main flow of the model. This being a file describing core behavior, we would expect it to be in the spec directory. And since it’s a JavaScript file, it will be in the spec/js sub-directory. The file is called main-story.js, and it contains a single bthread describing an almost-linear morning routine behavior. Let’s look at its top part:
bthread("main", function () { (1)
  request(Actions.wakeUp);    (2)

  requestAtAnyOrder(          (3)
    Actions.wearShirt,
    Actions.wearPants,
    Actions.wearSocks,
    Actions.wearShoes
  );
  ... (code continues below) ...
});| 1 | Starting the "main" bthread. |
| 2 | Requesting the "wake up" action. |
| 3 | Non-linear part - requesting the actions required for dressing up in all possible orders. |
One quick way to quickly familiarize yourself with a project is to visualize it! You can use provengo analyze -f pdf <path-to-project> to see the test space it generates.
|
This code is quite similar to the one we wrote in the previous tutorial, except that instead of requesting Event()s, we’re using a mysterious Actions object whose fields are events. To uncover this mystery, head over to the lib directory, and open Actions.js.
Actions and Events with Structured Data
Actions is a "classic" JavaScript library (see frame for a refresher on those). It contains events that mark morning routine actions at the "business-level" - e.g. "wear a shirt" or "brush teeth". Here’s an abbreviated version of the library. Basically, it just groups events in the returned object. The events are created using the makeActionEvent() function:
Actions Library - Excerptconst Actions = (function () { (1)
const LIB_SIG = "ACTIONS"; (2)
function makeActionEvent(verb, complement) {
return Event(verb + " " + complement, { (3)
verb: verb,
complement: complement,
lib: LIB_SIG,
});
}
return {
wakeUp: makeActionEvent("wake up", ""), (4)
wearShirt: makeActionEvent("wear", "shirt"),
... (more actions here) ...
};
})();| 1 | Definition of the Actions library object. |
| 2 | Library signature used by the library’s events. |
| 3 | Creating an event with structured data |
| 4 | Usage examples of makeActionEvent. |
The important thing to note in Actions's code - for the purpose of this tutorial, at least - is the way in which events are generated. The makeActionEvent function takes a verb and an optional complement. It then generates an event that contains them in a structured way, and marks the event as belonging to the library by adding a library signature to it.
Any code placed in a project’s lib directory will be available to the rest of the project.
|
Events with Structured Data
So far, we’ve seen events that hold a string, e.g. Event("wear shoes"). That string is the event’s name. It is useful to an extent, but extracting data out of it requires parsing and possibly some post-processing. For example, given a Event("wear shoes") event, we would need to split its name in order to know what action is contains (wear, position 1) and what object that action is to be acted upon (shoes, position 2).
Luckily, such parsing is not required. That is because in addition to their name fields, events also have a data field. This field can contain any regular JavaScript value, including numbers, arrays, objects, and strings. To set an event’s data field, pass that data as the second parameter to the event’s constructor:
let e = Event("Wear Shirt", {
  verb: "wear",
  item: "shirt",
  itemColor: "Beige"
});

// code working with e
if ( e.data.verb === "wear" ) {
  ... (perform wearing activities) ...

} else {
  ... (do something else) ...
}
Bear in mind that the data field is optional - some events might not have it. Therefore, whenever working with the data field, always start by checking that it is there.
|
By convention, event libraries will store a library signature string on the event’s data.lib field. This allows code working with these events to know which library created them and act accordingly. In our example here, any event whose data.lib equals "ACTIONS" can be considered an "action event".
|
The Actions library is built using a common JavaScript trick for hiding its internals (the event maker function), and exposing only publicly useful functionalities (the events). Information hiding - sometimes called encapsulation - is important for effective code management, as it forces different parts of the system to interact with each other using distinct and well-defined interfaces. It’s very convenient to allow any piece of code to interact with any other piece of code in the project - but only for rather small projects. When systems grow a bit, code bases allowing this kind of access become hard to understand, maintain, and fix. Code in this state is sometimes called spaghetti code, as it’s impossible to know what parts will be affected when you pull an individual noodle.
Many programming languages use the private keyword to signify that certain constructs cannot be accessed from outside. JavaScript does not have this keyword, but it does have anonymous functions, whose internal scope is hidden from the rest of the code. The trick uses this scope as follows:
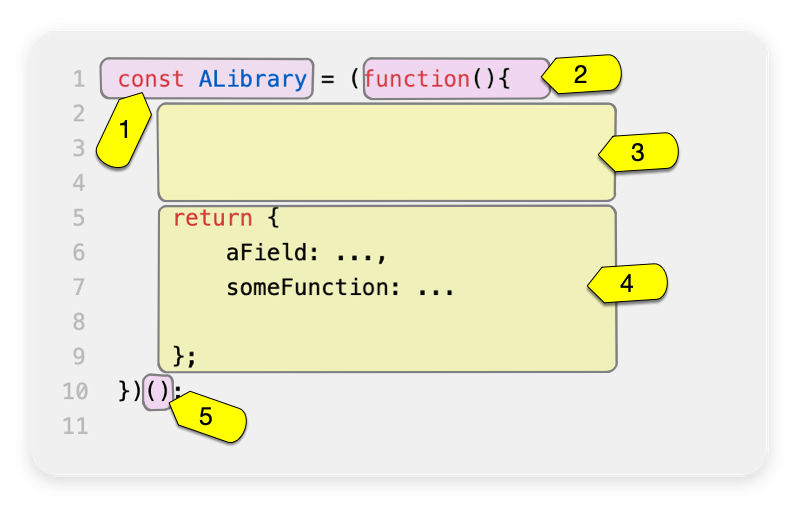
The ALibrary (marked as 1) constant will contain the library object, once initialized. It is initialized by invoking an anonymous function (2). The function’s body (3) is like Las Vegas - whatever happens there stays there, unless explicitly exported. That export is done by returning an object (4) that contains functionalities and values the library authors want to expose. However, this is just a function definition - it needs to be invoked. This is done by the parentheses just after the definition (5). All in all, the function is defined and immediately invoked, and its return value is stored as the library the rest of the code uses.
EventSets and Expressive Power
Our plan next is to have a series of automation related events after each Action library event. For this, we’ll need to tell Provengo to "block all Action's events".
So far, we’ve seen bthreads that waitFor or block a single event. If we want to wait for or block more than a single event, we need to use an event set. There are many ways of composing an event set. Let’s start with a simple example.
ABC/CAB and .or()
Consider a simple model with two bthreads. Each of these bthreads requests a single event: one of them requests Event("A") and the other requests Event("C"). Now, we wish to add another bthread that will add Event("B") between these two events, so that the overall series of events would be ABC or CBA. Here’s the code:
// Request A
bthread("A", function() { (1)
    request(Event("A"));
});

// Request C
bthread("C", function() {
    request(Event("C"));
});

// Ensure ABC/CBA
bthread("B", function(){
    waitFor( Event("A").or(Event("C")) ); (2)
    sync({
        request: Event("B"),
        block: Event("A").or(Event("C"))  (3)
    });
});| 1 | A simple bthread that requests Event("A") and terminates. |
| 2 | Using the .or method to create an event set that contains both Event("A") and Event("B"). |
| 3 | Using a similar event set in order to block the second Event("A")/Event("C") event from happening before Event("B") does. |
The "B" bthread in the above example composes an event set that contains Event("A") and Event("B") using the .or method of the Event class. This way, it can wait-for or block both events at the same sync point.
More EventSets
Because event sets are so very useful, there are many other ways of creating them. For example, you can use any(/A*/) to create an event sets that contains all events whose name starts with A. Or, you could use Event("Z").negate() to create an event set containing all events except for Event("Z"). For the full information about event sets and the EventSet class, please see the Provengo tool reference.
Every Event is also a special EventSet - a set that contains only itself. This means that wherever Provengo expects an event set, you can use an event.
|
To create an event set that contains all events from the Actions library, we can .or them all together. But that would be tedious and might break if we add another event to Actions and forget to update the set. Good thing there’s a better way of doing it: using a custom function. Here is the code:
EventSet("Any Action", function (e) {
    return (!!e.data) && ( e.data.lib === "ACTIONS"); (1)
})| 1 | This statement checks whether the passed Event is from the Actions library, by safely examining its data.lib field. |
The Any Action event set is initialized with a function that gets a single event and returns true or false. true means that the event belongs to the set, and false means it does not. Whenever Provengo needs to decide whether an event is a member of this set, it invokes that function with said event, and examines the result.
The natural place to store this event set is in the Actions library itself. If you put it there, you can also replace the usage of the "ACTIONS" constant with LIB_SIG, which would be more robust.
By convention, event sets that contain all events from a certain library are stored in the library object in a field called any. In the rest of the tutorial we assume Actions.any is such an EventSet. We recommend that you add this to your code - see the solution project if you’re not sure how to do it.
|
Automation!
It’s time to start telling a browser to do things. For this, Provengo uses the built-in Selenium Library, which of course relies on the Selenium project for automation. To bring a built-in library into scope, we put the //@provengo summon <lib-name> directive at the top of the file where we plan to use it. But don’t add it to the main-story.js file yet! There’s a better place for it.
In order to allow easy switching between automation targets, automation code is often placed in its own file. This way, switching automation targets is as easy as switching automation files. The starting point project contains a Selenium automation file called automation-layer.js in the spec/disabled directory. Move from spec/disabled to spec/js so that Provengo loads it, and let’s see how it’s built.
First, let’s look at the top of the file. This snippet brings the Selenium library into scope, and initializes a selenium session. All browser interactions are done through these sessions. A model can contain more than one session, but for now we’ll only have one.
//@provengo summon selenium                   (1)
const session = new SeleniumSession("user1"); (2)| 1 | Bring the Selenium Library into scope |
| 2 | Create a selenium session. |
Creating a selenium session does not start a window. For this, we need to call the .start(URL) method, like in the script below:
// open the browser before any action happens
bthread("starter", function () {       (1)
    block( Actions.any, function(){    (2)
        session.start(URL);            (3)
        session.waitForVisibility(COMPONENTS.SVG_ELEMENTS.svg, 5000); (4)
    });
});| 1 | Start a new bthread |
| 2 | A block code. While this block runs, none of the events from the Actions library can be selected. |
| 3 | Starting the sessions - a browser window will open. |
| 4 | Waiting for visibility of a component, to ensure the window had loaded and is ready for interaction. |
The "starter" bthread starts up a browser window and waits up to 5 seconds (5000 milliseconds) for the morning routine window to be ready. By wrapping the session commands in a block( Actions.any, {}) block, the bthread ensures no business-level activities can occur while the startup session runs.
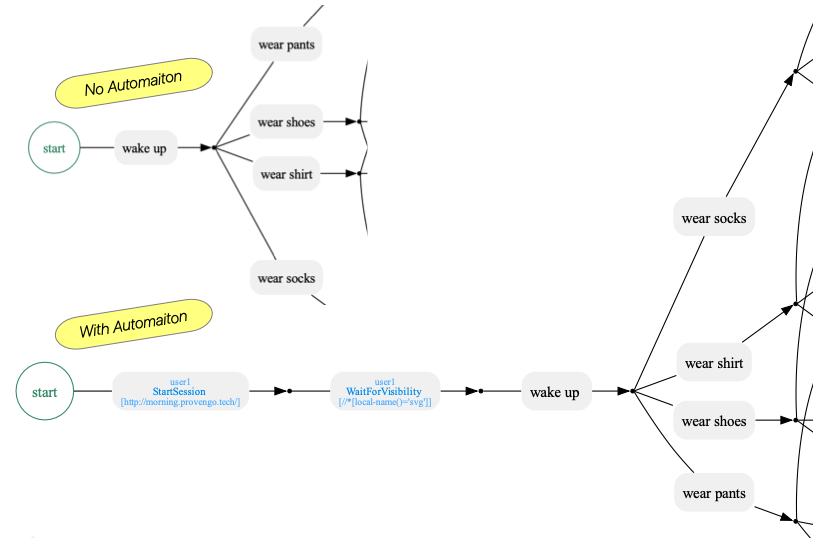
Actions.any while starting the browser, we prevent the business process from proceeding while the browser starts.Now we have a browser session and a browser window open. Next, let’s add the automation actions for the Actions.wakeUp event. This will be done using a bthread that waits for Actions.wakeUp, and then blocks all Actions events while clicking the wake up button and inspecting the web page for expected changes. Here’s the code:
bthread("wake-up", function(){                               (1)
    while ( true ) {                                         (2)
        waitFor( Actions.wakeUp );                           (3)
        block( Actions.any, function(){                      (4)
            session.click(COMPONENTS.BUTTONS.sleep);         (5)
            session.waitForVisibility(COMPONENTS.SVG_ELEMENTS.eyeInnerLeft, 5000);
            session.waitForVisibility(COMPONENTS.SVG_ELEMENTS.eyeInnerRight, 5000);
        });
    }
});| 1 | A regular bthread definition |
| 2 | A while loop, in case the trigger event is invoked more than once. |
| 3 | Waiting for the business-level event, Actions.wakeUp. |
| 4 | Blocking all Actions events while handling Actions.wakeUp. |
| 5 | Automation instructions. The component locators are stored in /data/website-constants.js file. |
This automation bthread is just a regular bthread - nothing fancy about it. It repeatedly waits for the Actions.wakeUp event. When this event is selected, it blocks all Actions events, and starts performing the automation actions implied by Actions.wakeUp. Note that we do not directly use element locators here; rather, we store all locators in the website-constants.js file at the project’s data directory. This allows the automation code to be more readable, and also easier to maintain in case locators change.
The while loop wrapping the body of the bthread is required in case the "business level" event is selected more than once.
Running Tests with Automation
|
Automation Setup
By default, Provengo uses SeleniumManager to automate browsers. This means that on a normal machine, things should "just work". However, in certain situation - using the Edge browser on Windows machine from a non-admin account is one example - some setup might be required. In such cases, please contact your IT administrator, or automate using Chrome or Firefox. Setting the automated browser is done using the |
To run a random test, we use the run sub-command, like so (but don’t run it yet):
provengo.sh run <path-to-project>Normally, Provengo runs with the browser window hidden, so as not to block the user from using the computer for other things. However, when running an automation for the first few times, it’s useful to see what’s going on. This is done by adding the --show-sessions flag to the commandline. Additionally, if an automation step fails, it might be useful to leave the browser window open. This way, if a the step failed due to a change in one of the component locators, it is easy to find that component and update the locator’s code. Normally Provengo will just close the session and report an error. Instead, to make is keep the window open, add the --dev-mode command. So the full command looks like this (you can run this now):
provengo.sh --dev-mode run --show-sessions <path-to-project>| In this tutorial we see how to run a single test, randomly chosen from all the tests possible in the test space. To generate a test plan and run multiple tests, please refer to the next tutorials. |
After running some tests, you might want to see the test results. To do so, use the report sub-command:
provengo.sh report <path-to-project>Provengo will assemble the report and will open a browser displaying it, screenshots and all. The report is a self-contained static site, so it can be zipped and sent to colleagues, or archived. The report is generated in the project’s products/report directory. Provengo will print the generated path, just in case.
Improving Automation Code
In this section we will improve the automation code shown in the previous section: we will reduce repeating elements, and make it more readable. The code in the solution already looks like this, and here’s the explanation of how we got there.
First, let’s recall the basic structure of the automation code:
bthread("BTHREAD_NAME", function(){
    while ( true ) {
        waitFor( EVENT );
        block( Actions.any, function(){
            AUTOMATION_ACTIONS
        });
    }
});
As you can see, the repeating structure is an infinite while loop, enclosing a block that waits for an event, and then blocks all Action events and performs automation actions. The while loop and trigger can be hidden behind on - a function from _bp-base, the basic BP language developed by Provengo. Here’s a shorter version of this code, using on:
on( EVENT, function(){
    block( Actions.any, function(){
        AUTOMATION_ACTIONS
    });
});
That’s better! The while loop and waitFor are gone, and we have a more idiomatic representation of what we want to happen after what event. But we can take it a step further, since the automation actions are always executed inside a block(Actions.any) block. This is very project specific, so bp-base won’t have code for this, but we can easily write a function for doing the repetitive work for us:
function refine(actionEvent, automationActions) {
    on( actionEvent, function(){
        block(Actions.any, automationActions );
    });
}
This function takes an event and a function containing automation instructions. It then wraps these instructions in a block, which is passes to on. As a result, adding automation to high-level events becomes much easier:
refine( EVENT, function(){
    AUTOMATION_ACTIONS
});
And there you have it: going from at least 8 lines in the initial version, to at least 3 lines using refine.
Next Steps
Congratulations! In this tutorial you’ve learned about event sets, libraries, browser automation, and the model refinement concept. Next up, we’ll see how to compose optimized test plans.
Some notes:
-
This tutorial was about direct automation. Provengo also supports indirect automation, where it creates scripts for other systems to execute. We will look into this in one of the next tutorials.
-
Provengo also support REST API, commmandline, and other automation targets. Please see our reference documentation to see all the options and how to use them.