Checking Your Models
- When completing this tutorial
-
You will know how to validate and verify your system’s behavior and requirements.
- This is useful because
-
By verifying and validating your test models, you ensure that you work on the right "thing" - that is, what the product/client/business intended the system to do. You also verify that the desired system behavior complies with defined constraints. Since verification and validation can be done before the system is implemented, they are very effective in ensuring the entire team is aligned, and in preventing re-work.
- Code Companion
-
https://github.com/Provengo/TutorialsCodeCompanion/tree/main/6-validation-and-verification
- Pre-Requisites
-
-
Automations tutorial
-
Manual tutorial
-
In this tutorial we will cover the concepts of validation and verification using Provengo. Provengo, being a model based tool, enables validating and verifying not only the system’s alignment with the requirements, but also the correctness and completeness of the requirements and specifications themselves.
The goal of validation and verification is to confirm that the test models accurately capture the intended behavior, functionalities, and constraints of the tested system, and to ensure that the derived test cases are effective in covering the intended aspects of the desired system behavior.
We will continue using the morning routine simulator and the model we’ve developed so far. We’ve prepared a start project in this tutorial’s code companion. We recommend using that project as a starting point. As usual, the companion also has a sample solution you can use as a reference.
This tutorial is organized as follows: First, we’ll see how provengo can detect problems in the requirements/specifications. We’ll then introduce block and rainy day checks, and learn how to carve out invalid scenarios from the model. In the last part, we will cover an example usage of halt functions together with an automation layer.
|
Detecting Violations
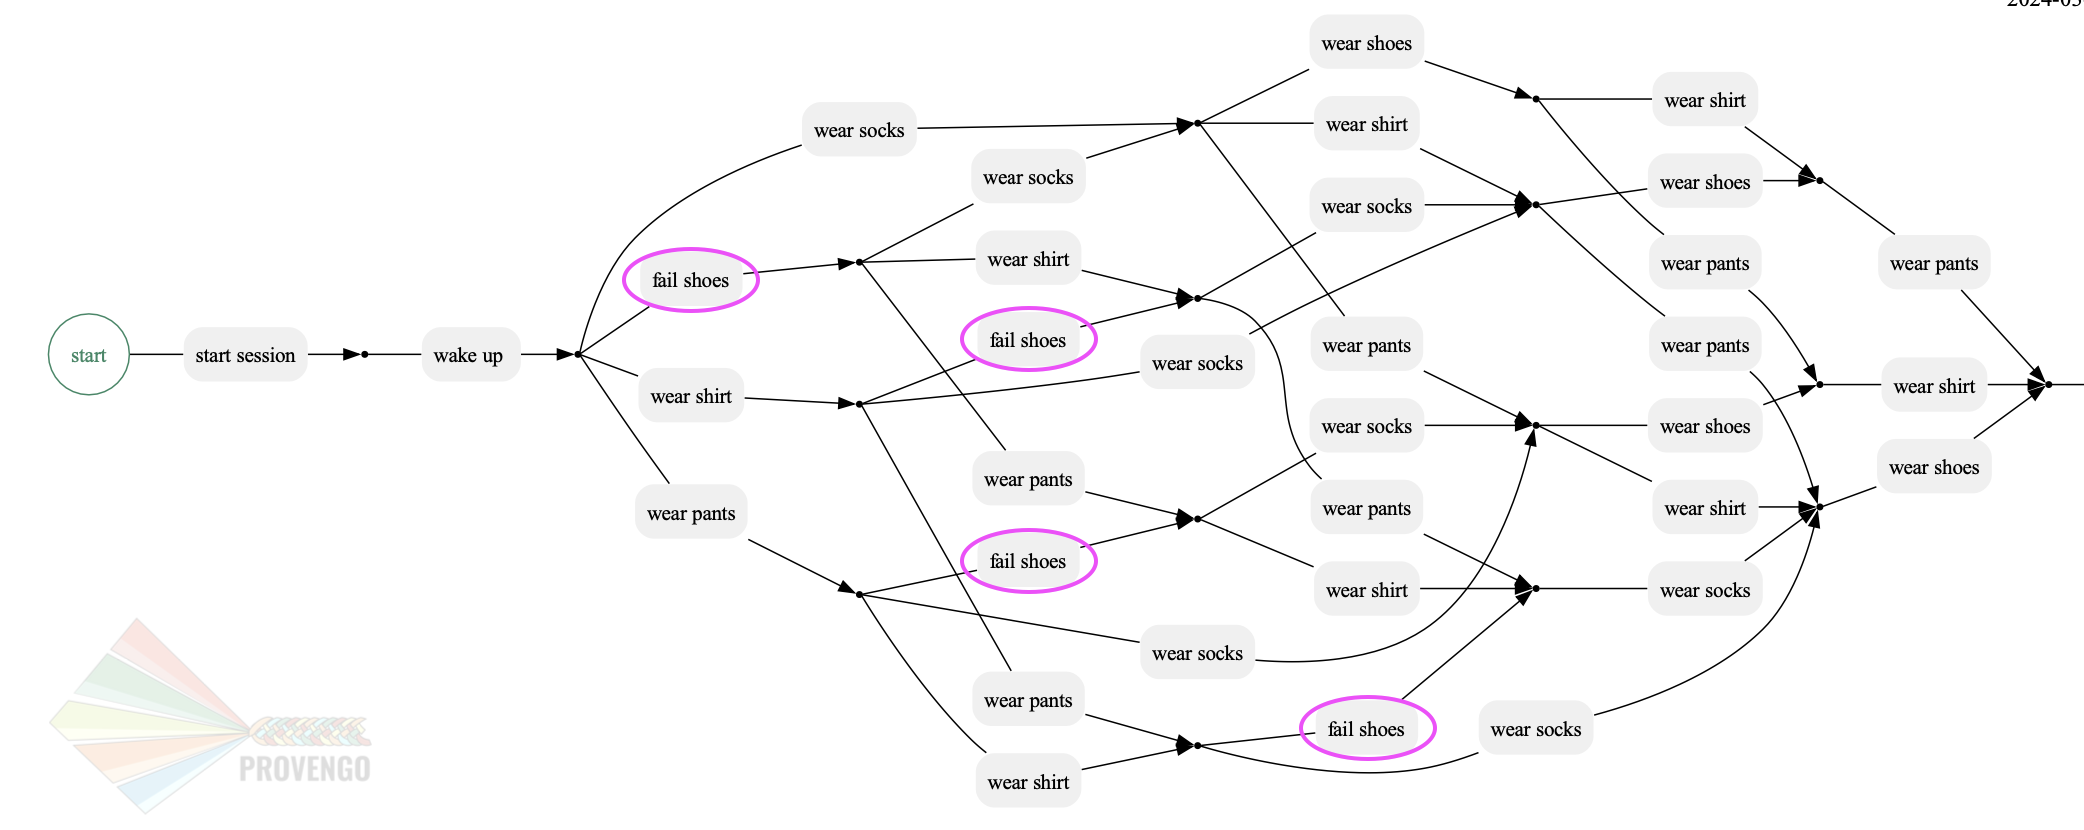
Let’s start with drawing the morning routine flow we’ve been working on so far.
Make sure the manual-layer file is under the spec/disabled directory so the model only includes business level steps.
|
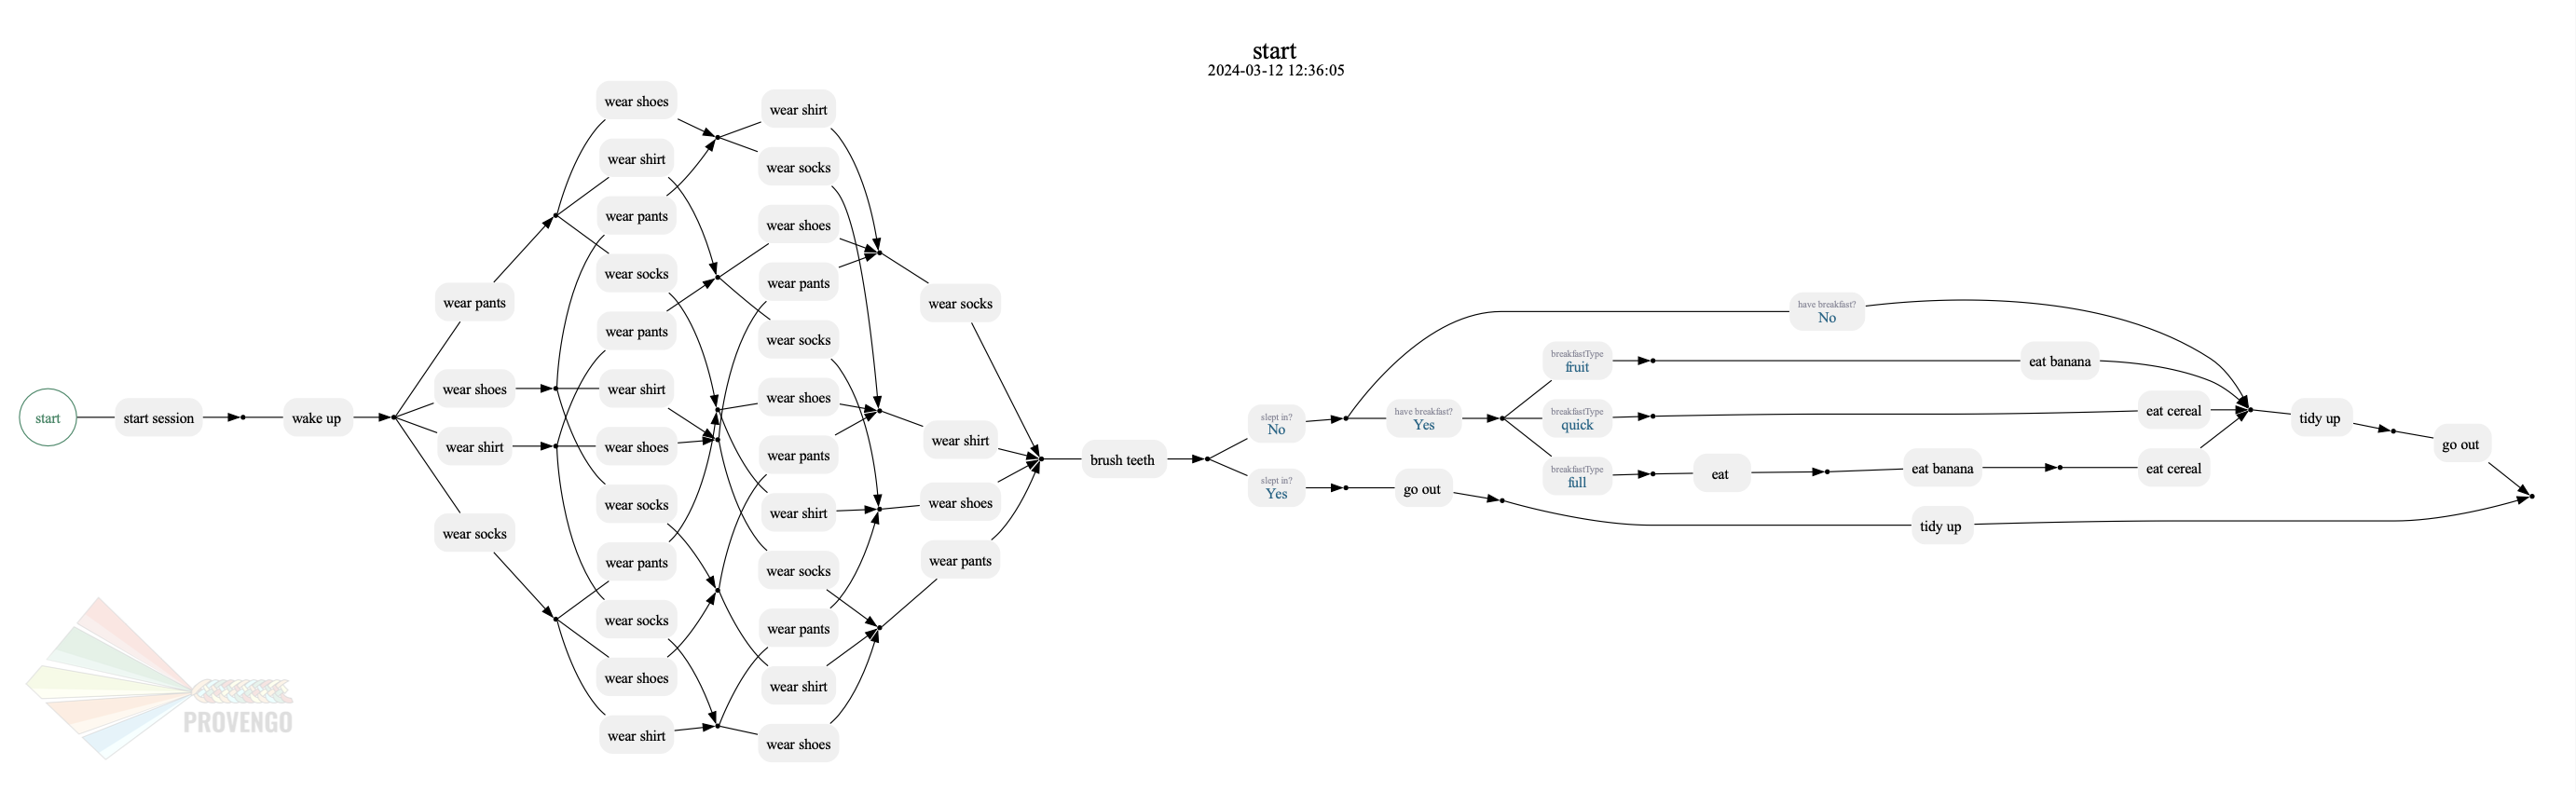
The flow consists of two main parts; Dressing up and having breakfast. In this tutorial we’ll focus mainly on the dressing up part. Take a closer look.
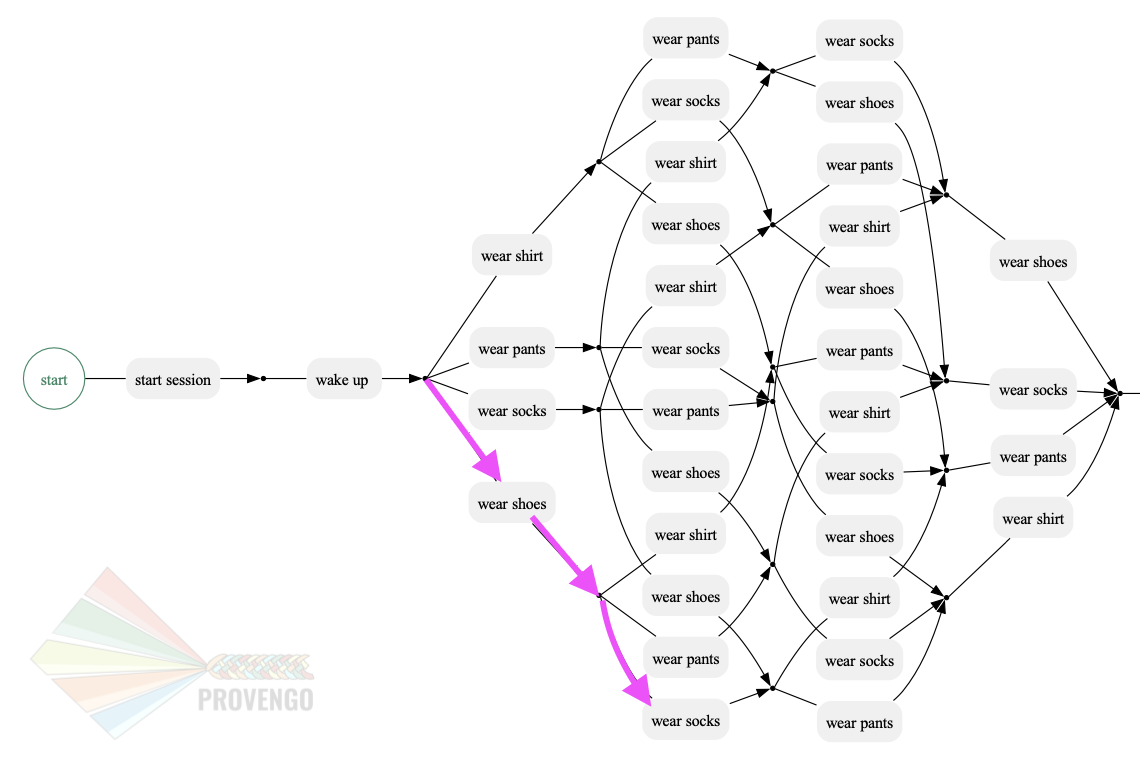
It turns out we have a problem in the requirements. The system currently allows scenarios where people can wear shoes and only then wear socks (annotated with pink arrows). And, well… we shouldn’t wear socks over our shoes. So essentially it means that we’ve found a bug in the specifications, since they allow this invalid order of dressing up.
Handling Violations
In this section we will learn how we can handle cases like that, where there are invalid requirements to the tested system. We would like to detect them so that we can alert specification authors when they create specifications that do not make sense. To do so, let’s phrase a new regulation that forbids these scenarios from happening.
Forbid socks after shoes
To verify that the system adheres to the new rule, we’ll add a bthread that reports violation and stops the model execution whenever it meets the scenarios where the wear socks action occurred after the wear shoes action.
To stop and report an illegal scenario, we will use the halt(message) command.
Add a new file under the spec/js folder, call it regulation.js.
bthread("forbid socks after shoes", function(){     (1)
    waitFor(Actions.wearShoes);                     (2)
    waitFor(Actions.wearSocks);                     (3)
    halt("No socks after shoes");                   (4)
});| 1 | Defines the new bthread to be added to the model. |
| 2 | Waits for the wear shoes action. |
| 3 | Waits for the wear socks action. |
| 4 | After the two previous actions were completed - blow up and display the message passed to halt(). |
Draw the updated map again so you can see how Provengo detects the violations according to the new rule we’ve added to the model.
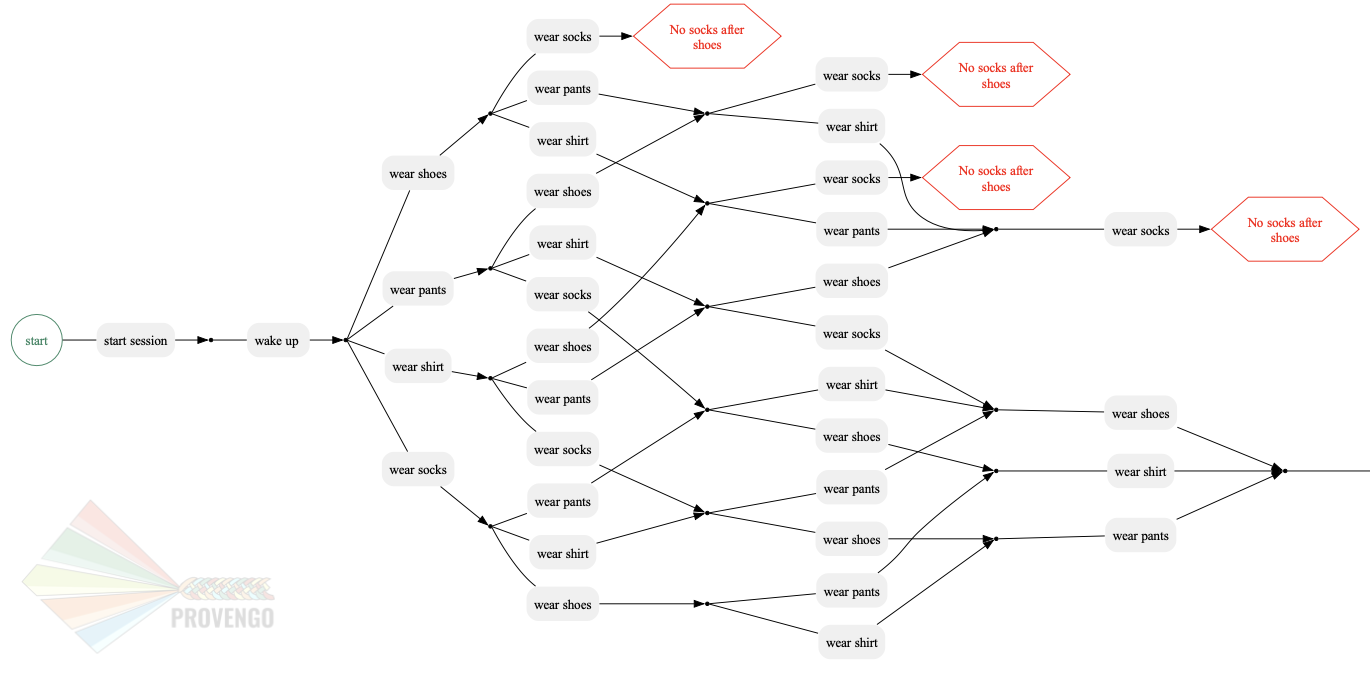
As you can see, the system detects scenarios that violate the regulation, and marks them on the graph. This way, we can take the map to the product manager (or to whoever is responsible for building the requirements) and explain what are the problems with the requirements, and how to get to a situation where the requirements are violated.
When we have a new regulation, we can be sure that whenever there’s a scenario that violates to this rule, the system will detect the violation and will report the reason, by adding a verification bthread to the model
We now need to prevent these invalid scenarios from occurring. In the next step, we’ll explore methods to ensure the system functions as expected when performing negative tests. We will first introduce the two possible approaches for testing negative scenarios, then we’ll see how to implement it in our project.
Negative Scenarios
Commonly, when testing software systems, we have cases in which we need to verify and validate a system’s compliance with negative scenarios. We need to ensure that the system’s behavior aligns with the "can’t do X" requirement as specified, and verify that the system correctly prohibits or restricts actions related to "X."
The phrase "Can’t do X" can have two distinct implications. We can either decide that we want to ignore these scenarios or that we want to test that the system blocks users that try to execute them.
- 1. Logical Infeasibility Assumption
-
In this approach, we assume that there’s no point in testing scenario "X". Therefore, we want to remove these scenarios from the test model, as creating tests that check them would be a waste of time and might even create pointless test failures.
- 2. Test for Failure
-
Alternatively, you can interpret "can’t do X" as a requirement to test that the system prevents users from performing "X". This involves intentionally trying to perform "X" and verifying that the system responds as expected by failing gracefully.
| Both approaches are valuable in ensuring the correctness, reliability, and robustness of the system with regard to scenario "X." The choice between them depends on the specific testing objectives and the nature of the requirement. |
Socks And Shoes
Let’s get back to our morning routine simulator example and learn how to implement both testing approaches. For this, we first need to phrase a concrete statement based on the scenario we want to block:
Can’t wear socks over shoes
Assumption (Don’t test)
It doesn’t make sense to wear socks over the shoes. Therefore, we can just assume that it won’t happen. Let’s see how we can carve out the invalid scenarios off of the model.
The documentation site suggests some blocking constraints which are used to prevent events from happening. The one where event E cannot happen before F seems to fit perfectly.
// E cannot happen before F.
Constraints.block(E).until(F);
Let’s add a bthread that blocks the wearShoes action until the wearSocks action is visited. It will remove these invalid scenarios out of the model.
Create a new file under spec\js, call it assume.js and paste the code below inside. Then draw the new test space to see the results.
assume.js// @provengo summon constraints (1)
Constraints.block(Actions.wearShoes) (2)
.until(Actions.wearSocks); (3)| 1 | Brings the Constraints library into scope. |
| 2 | Blocks the wearShoes action by using block command. |
| 3 | Keeps Blocking the wearShoes action until the wearSocks action is visited. |
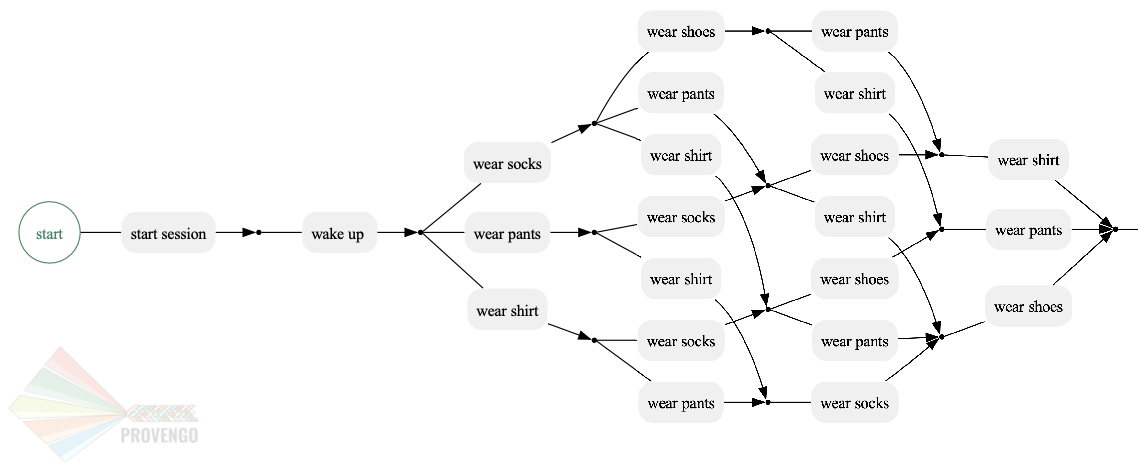
As you can see, the scenarios in which the wearShoes action was visited before wearSocks have all been removed from the test space.
Test for Failures / Rainy Day
The second approach, also known as Rainy Day checks, is to perform tests for wearing shoes before wearing socks and to validation that this action fails to complete. Let’s add a new file with a bthread that does that.
This file should be used together with assume.js, to prevent generation of a test case where socks are worn after shoes.
|
socksAndShoes-rainy.js// Can't wear shoes until we wore socks
bthread("fail shoes until socks", function(){
waitFor( Actions.wakeUp ); (1)
sync({ (2)
waitFor: Actions.wearSocks, (3)
request: Actions.fail("shoes") (4)
});
});-
Waiting for the
wakeUpaction so we can attempt wearing shows at the right time. -
Invoking the
synccommand with an object as a parameter. -
The
waitForfield of the object makes the bthread wait until theActions.wearSocksis selected. -
The
requestfield tells the Provengo engine to keep failing wearing shoes as long as thissyncis active.
The sync command shown here does two things at once:
-
Waits for an
Action.wearSocks, and -
Requests an
Action.failon the wearShoes action.
This translates to "try to fail wearing shows, unless some other bthread invoked wearing socks". Combined with the main bthread, this creates two test scenarios: one where we first fail wearing shoes and then wear socks, and another were immediately we wear socks.
| If a bthread waits-for an event, but no other bthread requests is, the waiting bthread will never wake up. |
As you can see, the system fails shoes every time the wearSocks action hasn’t been visited yet.
In other words, this bthread together with the block in assume.js file validate that we fail wearing shoes before we wear socks.
Let’s move on to seeing how to generate test cases for the flip side: validating the system blocks users from wearing socks over their shoes.
Define a new bthread that waits for the wearShoes action and then requests a fail on the socks. We’ve also added a mark so we can see these test cases clearly on the test space map.
socksAndShoes-rainy.js - Continuebthread("no socks after shoes", function(){
waitFor(Actions.wearShoes); (1)
if ( maybe("test socks") ) { (2)
request(Actions.fail("socks")); (3)
Ctrl.doMark("good - failed to wear socks over shoes") (4)
}
});-
Invoking the
wearShoesaction. -
Returns true or false describing wether to test socks or not. This splits each scenario into two sub-scenarios.
-
Requests a fail on the socks action.
-
marks the cases in which the test was successfully completed (failed to wear socks over shoes).
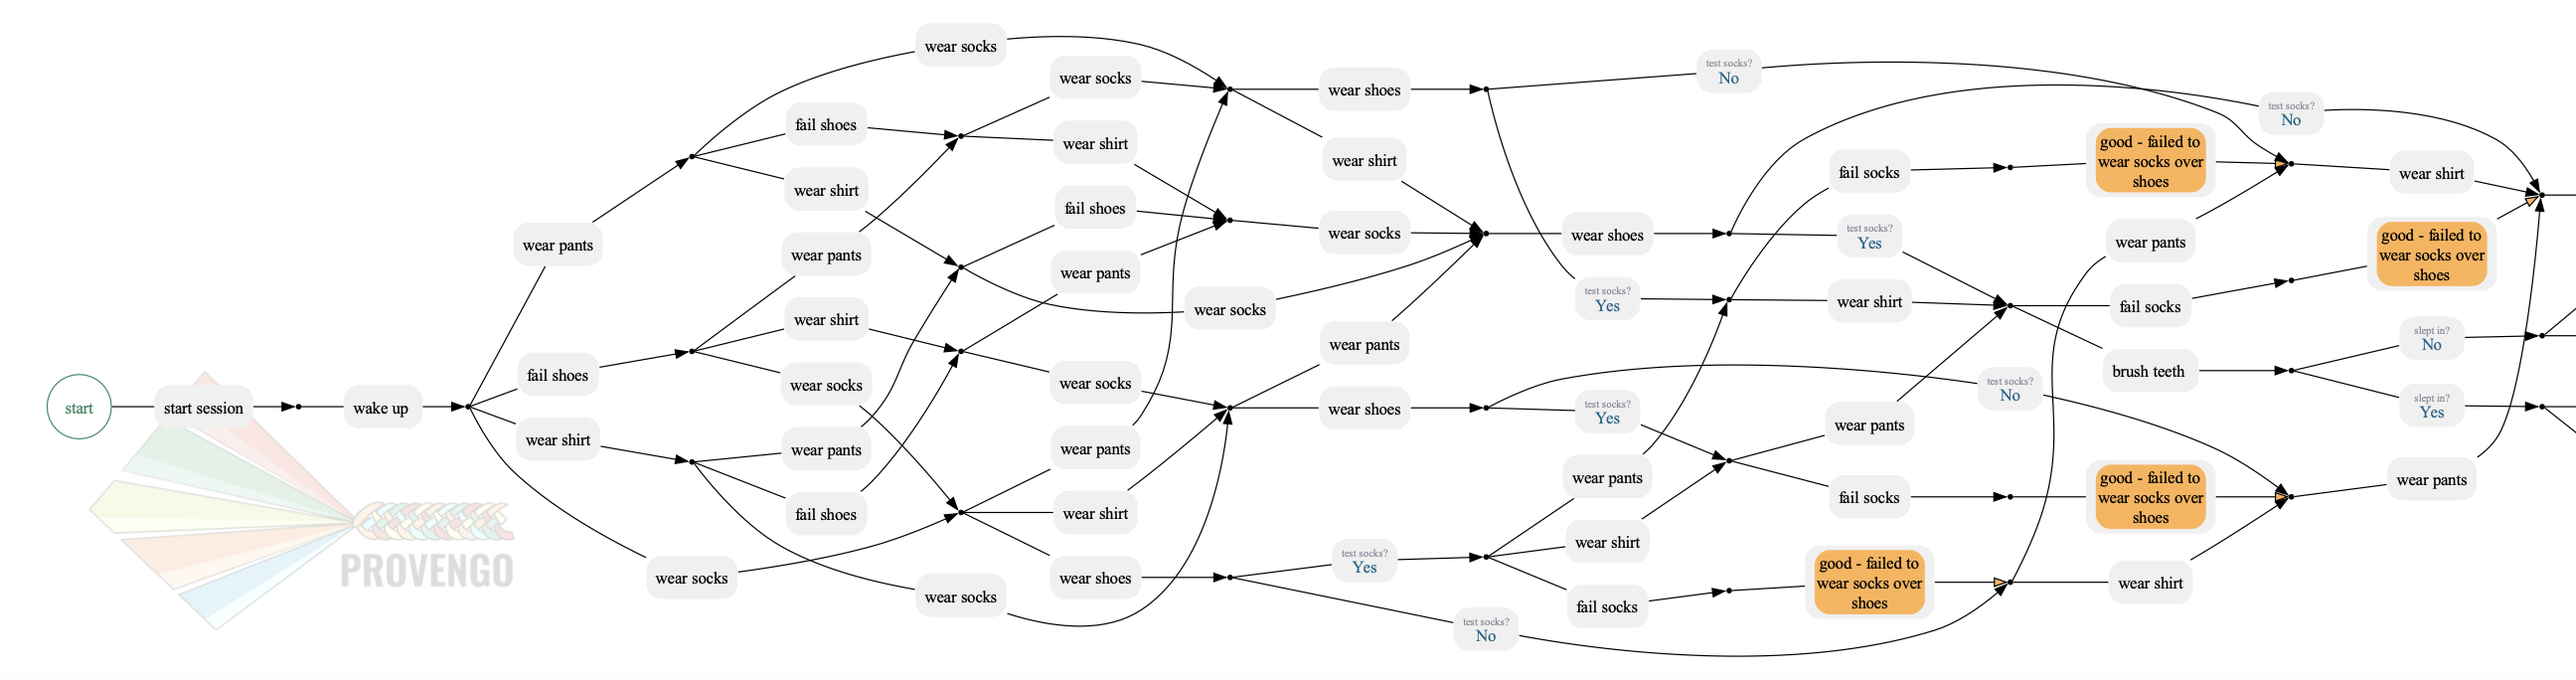
In each scenario, after the wearShoes action (that was already validated to be after the wearSocks action in the previous bthread) is visited, the scenario splits according to the question whether to test the wearSocks action or not. In the tested scenarios, the bthread requests a fail on the wearSocks action. So it validates we can;t wer socks over the shoes.
We then mark these paths so we can track them easily.
| The tests for socks also continues interweaving with the model, all the way until the end of the flow. |
Assertions
Provengo also provides us some different assertion methods to further validate the tests cases.
Some of them belong to the Selenium library we’ve already worked with in the Automations tutorial and some to the rtv (runtime values) library.
Drag the automation-layer.js file into the spec/js folder and find the two functions that handle the automation for the eatBanana and eatCereal actions. Now let’s see how we can save the runtime values for later use.
automation-layer.js// invoke the library at the top of the page
// @provengo summon rtv (1)
refine( Actions.eatBanana, function() {
session.click(COMPONENTS.BUTTONS.banana);
rtv.doStore("btn","banana"); (2)
session.store(COMPONENTS.TEXT_BOX.text,"textbox"); (3)
session.waitForVisibility(COMPONENTS.SVG_ELEMENTS.banana, 2000);
session.waitForInvisibility(COMPONENTS.SVG_ELEMENTS.banana, 10000);
});
refine( Actions.eatCereal, function() {
session.click(COMPONENTS.BUTTONS.cereal);
rtv.doStore("btn","cereal"); (4)
session.store(COMPONENTS.TEXT_BOX.text,"textbox"); (5)
session.waitForVisibility(COMPONENTS.TEXT_BOX.text, 2000);
session.waitForVisibility(COMPONENTS.SVG_ELEMENTS.cereal, 2000);
session.waitForInvisibility(COMPONENTS.SVG_ELEMENTS.cereal, 10000);
});| 1 | Brings the library into scope. |
| 2 | Uses rtv to store the runtime value of the button that was clicked - "banana" in a runtime variable called btn. |
| 3 | Stores the current text from the textbox’s element xpath in a runtime variable called textbox. |
| 4 | Same as above, this time with the button "cereal". |
| 5 | Same as above. |
Now let’s add a bthread in a new file textbox.js under the spec/js folder.
This bthread will validate the text results for the textbox on the morning routine simulator.
bthread("validate runtime eating textbox values", function () {
  waitFor(Actions.eatCereal.or(Actions.eatBanana)); (1)
  rtv.assertEq( (2)
    "@{textbox}", (3)
    "Now I eat @{btn}", (4)
    "Wrong text @{textbox} for btn @{btn}" (5)
  );
});| 1 | Waits for one of the following actions: eat banana or eat cereal. |
| 2 | Checks for equality of two expressions |
| 3 | Uses the @{} expressions to retrieve the runtime value of the textbox variable. |
| 4 | Same as above but for the btn variable. |
| 5 | The message to display if the assertion fails. |
The @{} expressions are part of the rtv library. Read more about it in the docs.
|
Sample and Run
Let’s now sample the model to generate a test suite of 10 random scenarios. Then, run this suite using provengo run -s <path-to-samples> <path-to-project>. Watch the console as it outputs the results.
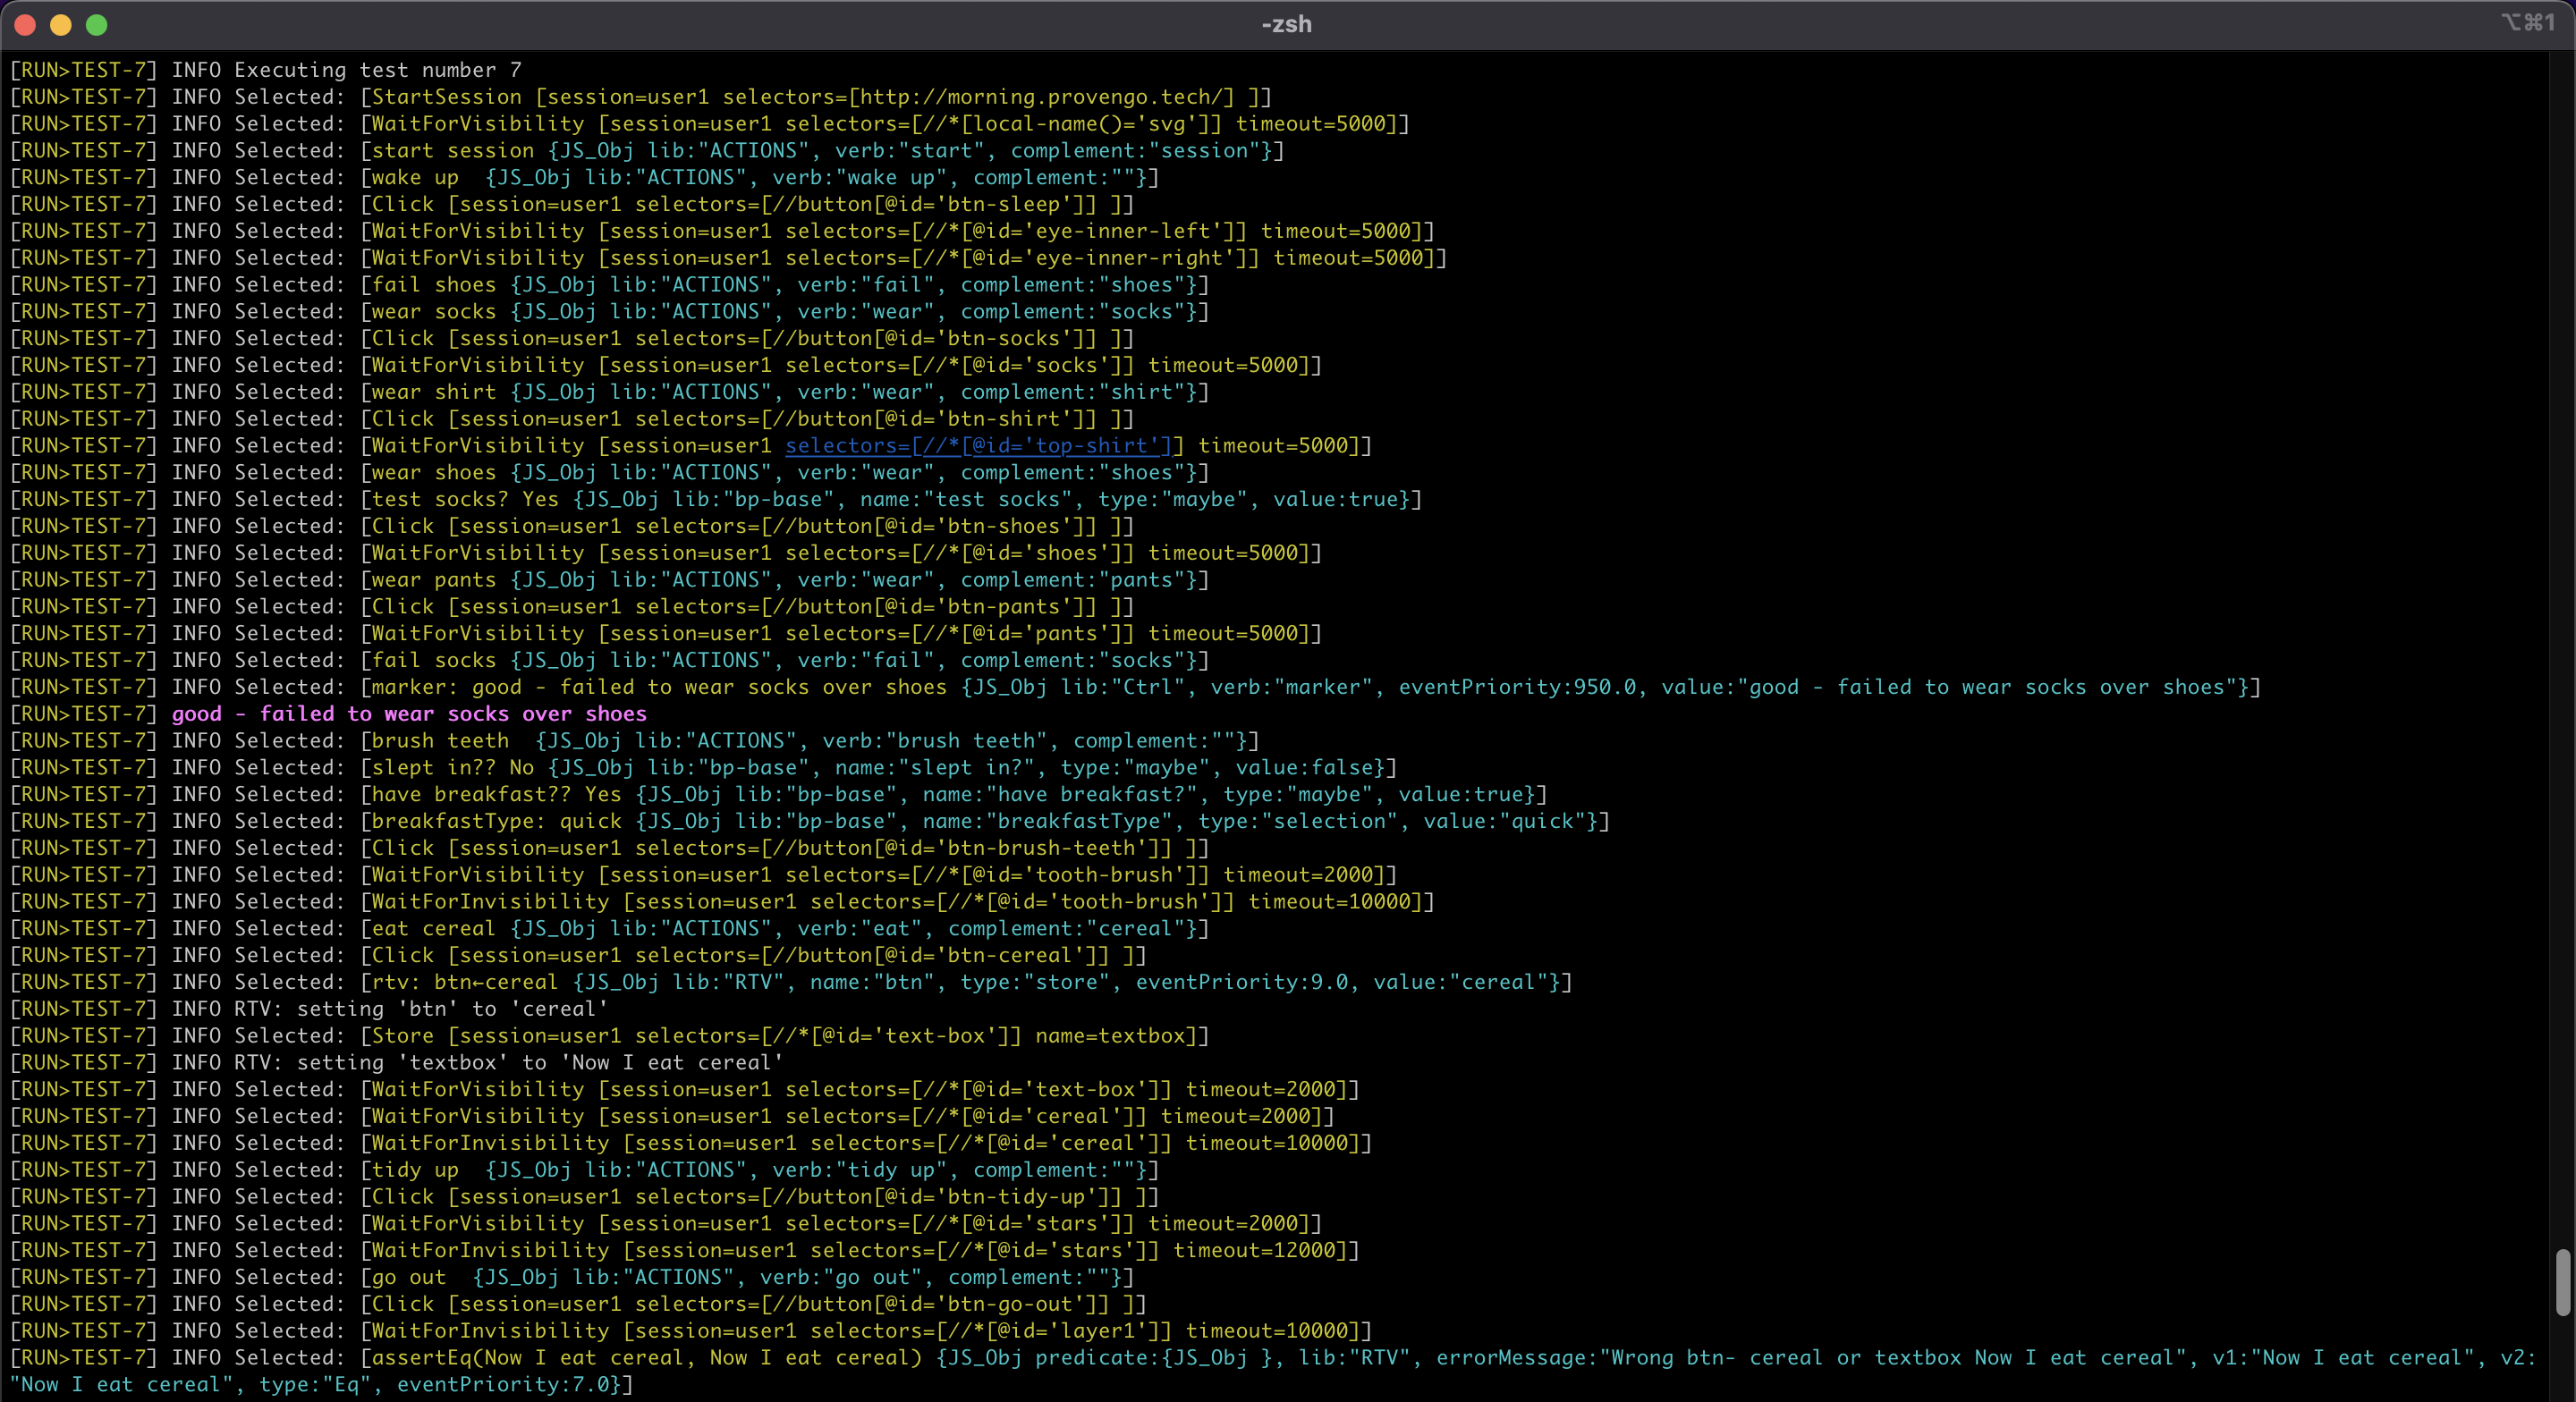
In the image above, we can see one of the random scenarios that were executed. It includes the rainy day check and the mark we’ve added to it, as well as setting runtime values and the assertion validation (in the last row).
Next Steps
Congratulations! In this tutorial you’ve learned about validation and verification. We’ve seen how to detect invalid scenarios in the requirements, how to verify that the system doesn’t violate regulations. we also covered the two approaches regarding negative scenario testing; Removing the invalid scenarios or checking that it fails to complete.