First Steps with Provengo
- When completing this tutorial
-
You will know how to create and work with projects using the Provengo tool; Learn the Behavioral Programming fundamentals; Familiarize yourself with project structure, execution and analysis; Know where to search for help, and how to fix model problems.
- This is useful because
-
These skills will allow you to create useful Provengo projects, and will serve as basis for more advanced Provengo skills.
- Code Companion
-
https://github.com/Provengo/TutorialsCodeCompanion/tree/main/1-first-steps
- Pre-Requisites
This tutorial covers the basic concepts of working with the Provengo tool. We will go through the moves of creating a behavioral model of a software system, and working with it. The model itself will be a simplified version of a personal morning routine[2]. More complex versions of this use-case - complete with web-browser automation, manual test generation, and test suite optimizations - will be presented in the next tutorials. For now, let’s focus on the basic mechanics of working with the Provengo tool. Off we go, then.
Model Overview
In this tutorial we will create a behavioral model of a morning routine. This includes that main behavior of waking up, preparing to leave the house, and then going out. We will also look at adding other behaviors, such as snoozing the alarm clock and preparing coffee.
Creating a Project
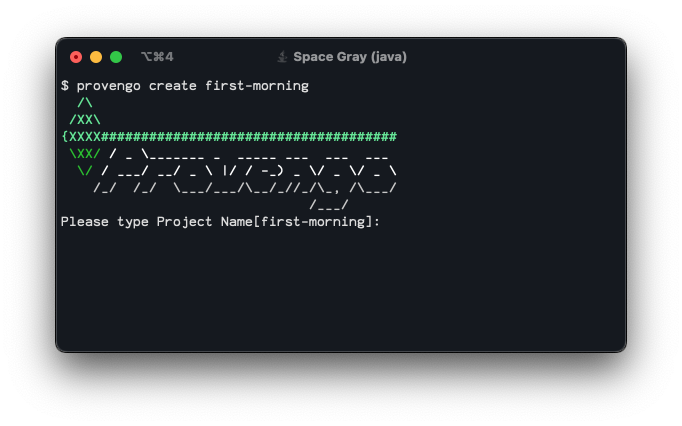
First off, let’s create a new Provengo project. To to this, we will invoke the run sub-command, like so:
provengo create first-morningThe Provengo tool asks us some questions about the new project, and then creates it in a folder called first-morning in the current directory.
|
The |
Before we look into the generated project, let’s examine the command we just ran. We ran the create sub command, and gave it the name of the new project as a parameter. All Provengo tool commands share the same structure:
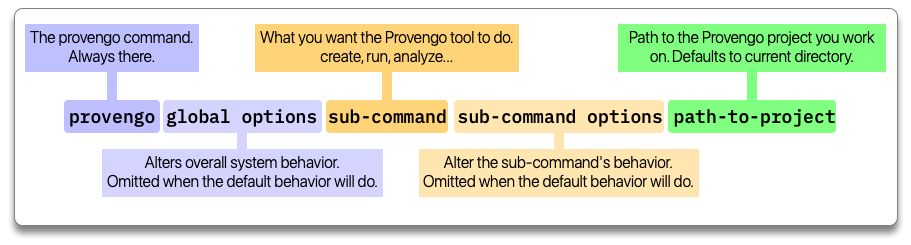
| Read more about provengo’s command line structure and global options here. |
Project Structure
Now that your first project is created, let’s examine what’s in it.
A Provengo project is a just regular directory a file system, similar to many other projects. This way it can be managed by version control systems, such as git. For this tutorial, we can about the following sub-directories and files:
data-
A place to store JavaScript files containing global constants.
spec-
This sub-directory contains the specifications - the part of the project that generates the required behaviors of the system under test. It is divided to sub-directories by specification type.
spec/js-
A sub-directory holding the part of the specifications written in JavaScript.
meta-spec-
A sub directory containing code for working with the specification (rather than working on it). For example, code for generating optimized test suites should go here, since these suites are composed of scenarios defined in the spec.
| If you’re curious about the rest of the items in the project folder, there’s a fully detailed description of a Provengo project structure at the reference documentation site. |
Your First BThread
BThreads (short for "behavioral threads") are one of the building blocks of a model. A bthread typically describes a simple behavior the specified application is required to follow. BThreads communicate with each other using events they can request, wait for, or block. More on this below.
We start creating the morning routine specification by adding the main scenario to the model. Since this scenario is part of the system behavior specification we are creating, it’s going to live in the spec directory. And since it’s going to be written in JavaScript, it’s going to live in spec's js sub-directory.
The spec/js directory contains a file called hello-world.js. It contains a "Hello, World" example which will only get in our way now, so delete it. Using your favorite editor or IDE, create a new file in spec/js. Let’s call it main.js, since it will contain the main behavior.
Now add the following code to the file main.js file, and save it. It contains a single bthread describing the main morning routine by requesting four events in a reasonable order. We’ll explain this code below, but first let’s run and analyze it.
bthread("main", function(){
request(Event("Wake up"));
request(Event("Brush teeth"));
request(Event("Dress up"));
request(Event("Go out"));
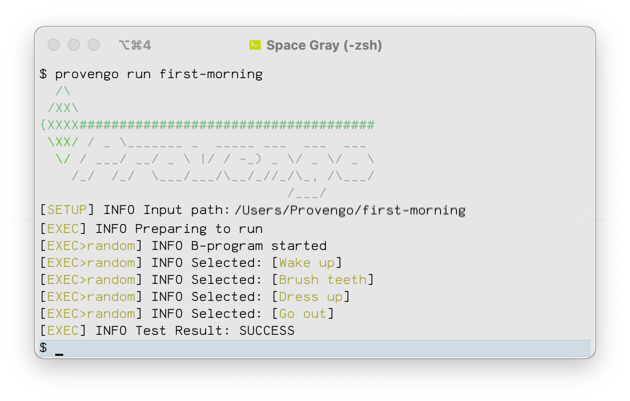
});Provengo models are run using the run sub-command. There are various ways of running a model or a test suite - the one that we’ll use now asks the Provengo tool to choose a random scenario defined by the model, and execute that scenario.
| As you have probably noticed, our model specifies only a single scenario to choose from. This will change soon. |
To run the model, go back to your terminal and type:
provengo run first-morningYou should see something like this:
Next up, let’s have the Provengo tool draw the model for us. To do so, we use the analyze command. Write the following in your terminal:
provengo analyze -f pdf --layout horizontal first-morningThis instructs the Provengo tool to fully analyze the our model, and draw it as a PDF file. The --layout horizontal part makes the flow go from left to right, rather than top to bottom.
|
To learn about sub command options from the terminal, invoke the sub command with Provengo will print the command options and possible parameter values. |
If all goes well, you should see the following drawing of the morning routine:
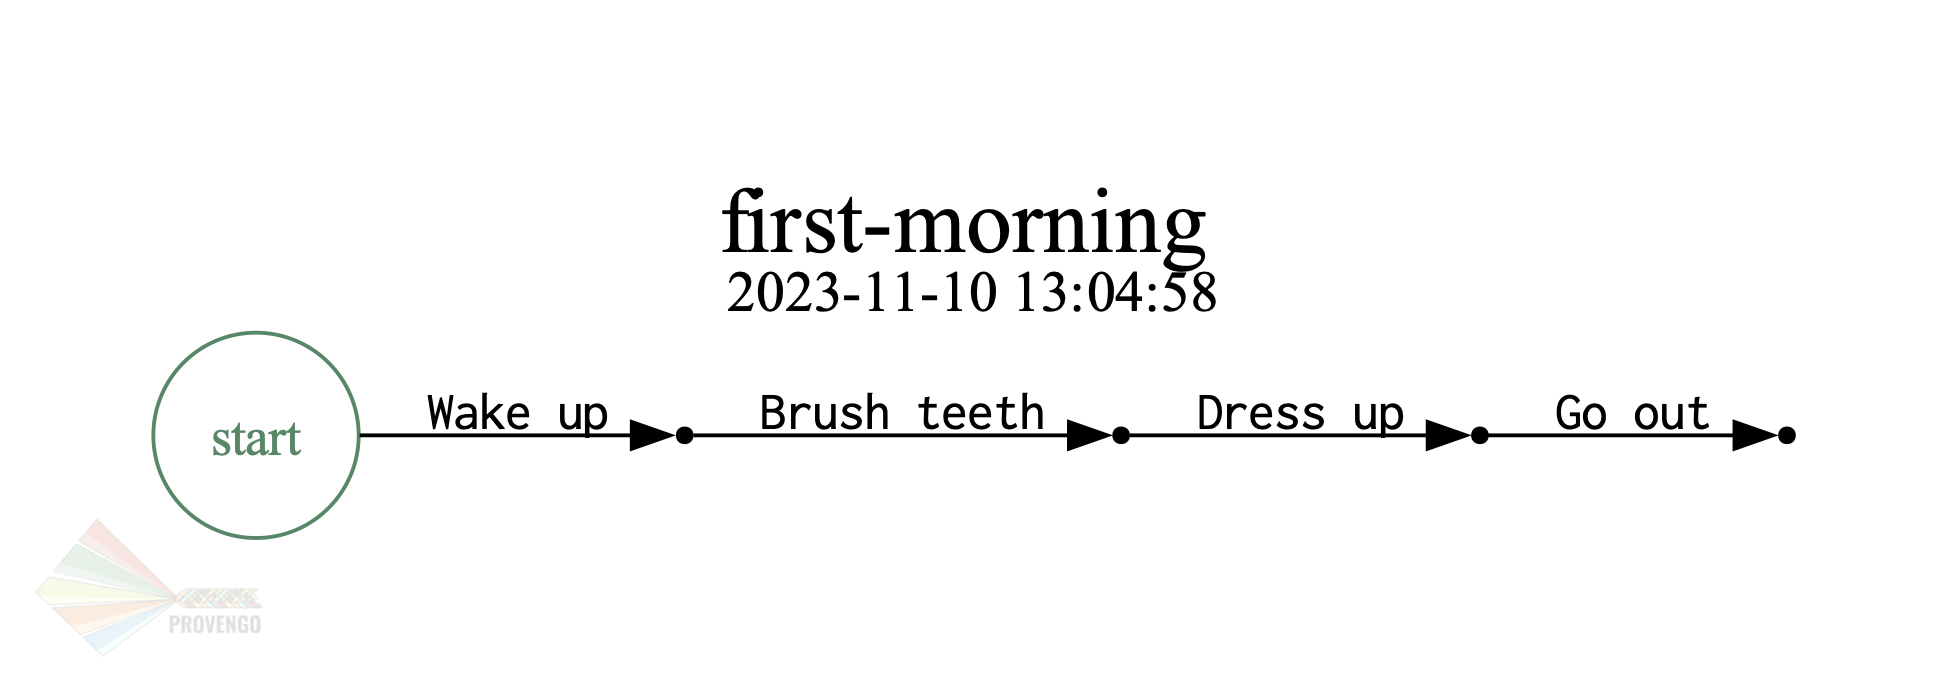
Now, let’s get back to that one bthread, and see how it’s built.
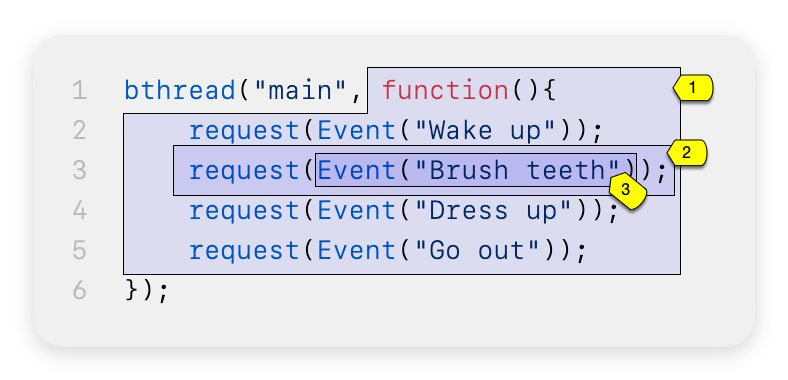
The first command used here is bthread. This command is invoked here with 2 parameters - the bthread name (mainly used for documentation and debugging purposes) and a function that contains the bthread’s body (marked as 1). The bthread command does not run that functions directly; rather, its registers a new bthread to be executed by the Provengo engine, and returns immediately after that.
Currently, the Provengo tool does not support JavaScript’s arrow functions ((a)⇒{bcd}). While we work on this, please use the full function syntax (function(a){bcd}).
|
The bthread itself contains a series of calls to request (marked by 2). This command makes the bthread request that the Provengo engine would choose to this event. This request does not mean that the event would be chosen immediately, or even at all. More about this below.
Last, marked by 3, we have the event itself. Events are the other cornerstone of Behavioral Programming, along with bthread. Events are used for communication between bthread, and between the model and the external world. A test scenario is essentially a sequence of events chosen by the engine. This choice is both initiated and limited by the bthreads in the model.
Events are generated using the Event constructor. This constructor receives two parameters - the event name, and an optional data object. We will look at why that data is useful at subsequent tutorials.
The bthread, request, and Event commands, as well as many other commands we’ll see, are an extension to JavaScript created by Provengo. They are not part of the ECMAScript standard.
|
Well, this covers our first b-thread, which is a very simplified description of a morning routine. Let’s make it a tad more realistic.
Morning Coffee and waitFor
Surprising as it might sound, many people brew coffee after they wake up. This a behavior, as so we can model it in Provengo. This behavior can be phrased in plain English like so:
After waking up, brew coffee, and drink it.
This being a behavior, we can add it to the model by adding the following bthread to the model:
bthread("morning coffee", function(){ (1)
    waitFor(Event("Wake up"));        (2)
    request(Event("Brew coffee"));    (3)
    request(Event("Drink coffee"));
});-
Define a new bthread called "morning coffee"
-
The behavior waits for the "Wake up" event
-
The behavior requests events for the coffee brewing process.
The new bthread, called "morning coffee", begins by waiting for the person to wake up (as most people cannot brew coffee while they sleep). This is done by the waitFor(event) instruction. When calling waitFor, the bthread is paused until the waited-for event is selected. Note that if an event is waited-for but no bthread requests is, the waiting bthread will never wake up.
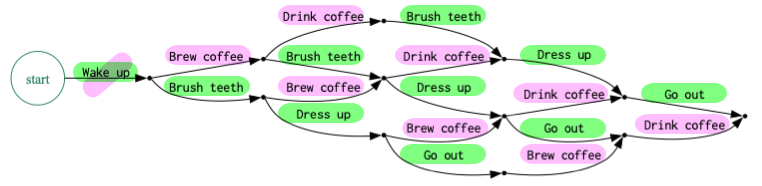
After Event("Wake up") is selected, the morning coffee bthread drives the coffee brewing and drinking process by requesting events, in the same way that the previous bthread, main, initiated and drives the main morning routine. The two bthreads continue in parallel, and are interweaved by the Provengo engine into all possible morning scenarios. To see them, let’s draw the process diagram again. As a reminder this is done by invoking:
provengo analyze -f pdf --layout horizontal first-morning| Event names are case-sensitive, so make sure you wait for the correct event with the correct capitalization! |
Here is the new scenario space. Each scenario starts at the "start" node at the left, and advances over the arrows - each arrow is an event. After Event("Wake up"), the "morning coffee" bthread starts advancing. At this point, two events are requested: Event("Brush teeth") and Event("Brew coffee"). The Provengo engine has two options for advancing so it takes both, by splitting the scenario space. This splitting and merging continues, until both bthreads are done - the modeled person went out and drank coffee.
Note that the order in which the bthreads are specified does not matter. This is because bthread only registers a bthread. Actual bthread execution is done after the initial JavaScript program ran to completion.
|
|
BThreads should never exchange data directly or though common data structures. This means no changing global variables. It is perfectly OK to READ them, but don’t write to them.
|
Well, we now have a more realistic morning scenario, but it contains some unrealistic scenarios - those where we brew the coffee after leaving the house. Let’s filter them out.
Brew First, Leave Later
First, let’s phrase concrete statement based on the scenario we don’t want to happen:
Do not leave the house before brewing your coffee
This type of statement is sometimes calls a negative scenario. That is, a scenario we do not wish to happen. These scenarios are described by regular bthreads, just like those we wrote before. But we will use a new command now: sync().
bthread("coffee before out", function(){
    sync({                             (1)
        waitFor: Event("Brew coffee"), (2)
        block: Event("Go out")         (3)
    });
});-
Invoking the
synccommand with an object as a parameter. -
The
waitForfield of the object makes the bthread wait untilEvent("Brew coffee")is selected -
The
blockfield tells the Provengo engine that it cannot selectEvent("Go out")as long as thissyncis active.
The sync command shown here is similar to the waitFor commands we’ve seen before, but it does two things at once:
-
Waits for an
Event("Brew coffee"), and -
Blocks
Event("Go out")from being selected.
This prevents the Provengo tool from generating scenarios where the person gets out of the house before the coffee is brewed. This is because, at all points where the other two bthreads request Event("Go out") and Event("Brew coffee"), the Provengo engine does not have a choice - it must select Event("Brew coffee") because Event("Go out") is blocked. Once Event("Brew coffee") is selected, the "coffee before out" bthread completes its run, and the constraint, which is now fulfilled, is lifted.
|
It’s all
syncThe is equivalent to this: |
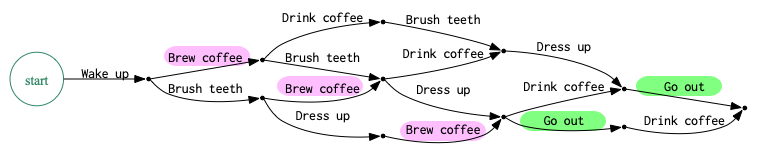
If draw the new scenario space, we get the following, improved one:
|
The workflow in the last two sections is an example of a common technique when working with Behavioral Programming and the Provengo Toolkit: enrich the model with behaviors that create many scenarios (and, in turn, a rich test plan) and then remove unwanted scenarios using more bthreads and blocking. |
And a Bit More Formally
Now let’s dig a bit deeper into what’s going on in a Provengo model[3]. There are some differences between run and analyze, so we’ll start with the more intuitive one.
How run Runs
When you invoke provengo run, the Provengo engine start executing the following process:

Here is what’s happening at each stage:
- 1. Script Phase
-
Provengo reads the JavaScript files (later, when we’ll add other types of source files, these will be read too). The files are then executed as a script. Calls to
bthread()register bthread for execution after this phase ends. - 2. BP Phase - Run
-
Each bthread runs until it calls
sync()(or its convenience variants:request(),waitFor(), andblock()). At this point, the bthread is paused. We say that it got to a synchronization point, and the Provengo engine registers which events it requested, which event it waits-for, and which events it blocks. This is known as a synchronization statement. - 3. BP Phase - Event Selection
-
Once all bthreads got to a synchronization point (or finished execution), the Provengo engine tries to find an event that was requested and not blocked. We now have two options:
-
One or more such events are found: The engine selects one event from those that are requested and not blocked. Bthreads that have requested or waited-for this event are resumed. They run until they all arrive at a new synchronization point (phase 2 again), and the system goes back to phase 3, and attempts to select a new event.
-
No such event is found: The run ends. This happens when all bthreads run to completion (like in our example here), when no bthread requested an event (that is, they all wait-for or block), or when all requested events are blocked.
-
In many cases, the event selection phase has more than one event to choose from, which means the engine can generate many scenarios from the same model. Let’s look at a sample run on the model we’ve just developed.
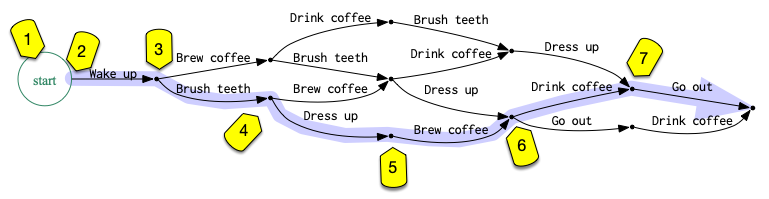
The run begins at the script phase. In this phase the Provengo tool reads main.js and executes it. This translates to three calls to bthread() (the bthread bodies are not executed at this phase). In the diagram, this phase happens in the start node (marked as 1).
Next, the threads are executed up to their first synchronization point. At the first synchronization point (2) only a single event is requested - Event("Wake up"). This event is not blocked, so it’s selected. This causes the main and morning coffee bthreads to wake up (the first requested this event, the latter waited-for it). Both bthreads request their respective events (synchronization point 3). Since neither events are blocked, the Provengo tool can choose which event to run. Let’s say it chose Event("Brush teeth"). The model advances to synchronization point 4, where, again, there are two events to choose from. Note that Event("Brew coffee") is again an option, since the morning coffee bthread did not advance last time. In this example, the Provengo engine selects Event("Dress up"), and we move to synchronization point 5.
Two events are requested at synchronization point 5, but only one is selectable. The main bthread requests Event("Go out"), and the morning coffee bthread request Event("Brew coffee"). However, the coffee before out bthread blocks Event("Go out"), so it’s not a selectable at this point. The Provengo engine select the only option is has - Event("Brew coffee"), and we move on to synchronization point 6.
On the way to point 6, the coffee before out bthread is resumed, as it waited-for Event("Brew coffee"). Since that bthread contained only a single instruction (that sync() call) it completes its execution and is removed from the model. The morning coffee bthread advances, and when we get to point 6 there are again two events to choose from: either we go out and drink the coffee later, or we drink first and then go out.
Here the tool decided to drink first. The morning coffee bthread completes its run, and at point 7 only a single bthread is left, its request for Event("Go out") is granted. The execution ends, since there are no more bthreads. The series of selected events - sometimes called an execution trace - is the generated scenario we can later use for testing or business logic validation:
Wake up → Brush teeth → Dress up → Brew coffee → Drink coffee → Go out
How analyze Analyzes
The analyze command works in a similar way, but when there is more than a single options, it maps all these options by splitting the scenarios. Note that this does not mean the model always splits - when event selections lead to the same model state, the arrows converge. The output for the analyze command is not a single scenario, but a map of all possible scenarios defined by the model.
| The full file loading order is detailed at Load Order. |
Wrapping Up
Congratulations - you’ve just created your first Provengo model. Along the way we’ve learned how to work with the Provengo tool, what are Provengo’s Behavioral Models, the bthreads that compose them, and the events these bthread use to synchronize with each other, and how one can execute or draw a Provengo model.
In the next tutorials we’ll see how to put these skills to use in order to create comprehensive test plans and to validate and verify business logic, get some automation done, and learn higher-level languages that allow creating complex models easily.
if/switch/?:). Knowledge of ``advanced'' JavaScript frameworks such as Node.js or React is not required.