Creating Manual Tests
- When completing this tutorial
-
You will know how to create manual test books for a website using Provengo. How to tag tests so you can easily adjust test suites, how to set the script names, and how to add various meta-data to the manual testing instructions.
- This is useful because
-
Manual test book generation is useful for obvious reasons. Also, is another example of model refinement which is a powerful concept for modelling required system behaviors using BP.
- Code Companion
-
https://github.com/Provengo/TutorialsCodeCompanion/tree/main/4-creating-manual-tests
- Pre-Requisites
-
-
Creating Test Suites tutorial
-
In this tutorial we will create manual tests for the morning routine simulator. We will continue working with the model developed in the previous tutorial, and refine it with manual events using a manual library. The technique we use here to add manual-layer details to the model is another example of model refinement concept as introduced in the automations tutorial. A starting project is available in this tutorial’s code companion. You can use it to following along with this tutorial. We recommend using the solution as a reference. That solution is just a suggestion though - you might come up with another solution that is just as valid.
This tutorial is organized as follows: First we’ll see how to generate a test book using different formats. Then, we’ll refine our model with manual layer details. To do so, we will define a new library - Manual. Then, we’ll see how to create a manual test book with manual instructions and how to add filters, tags and labels to it. And last, we’ll set script names and add various meta-data to the instructions.
|
Manual Test Book Generation
The gen-book sub-command generates a manual test book based on a run source file, such as those created by the ensemble or sample sub-commands. Books can be generated either as static HTML websites, or as Excel files.
During the book generation process, custom user code is invoked to translate the event sequences into test scenarios.
A basic user code for it is automatically created for you when you use the create sub-command. It is available at ${project directory}/meta-spec/book-writer.js. Read more about it in the API reference.
Before refining the model with manual instruction or making any changes to the user code that generates the test book, let’s see how the book looks like. Use the code-companion start project and type provengo gen-book <path-to-project>
If you don’t specify a different source path, Provengo will look for the ensemble.json file to generate the test-book. If that file doesn’t exist, provengo creates it and then uses it to generate the test book.
|
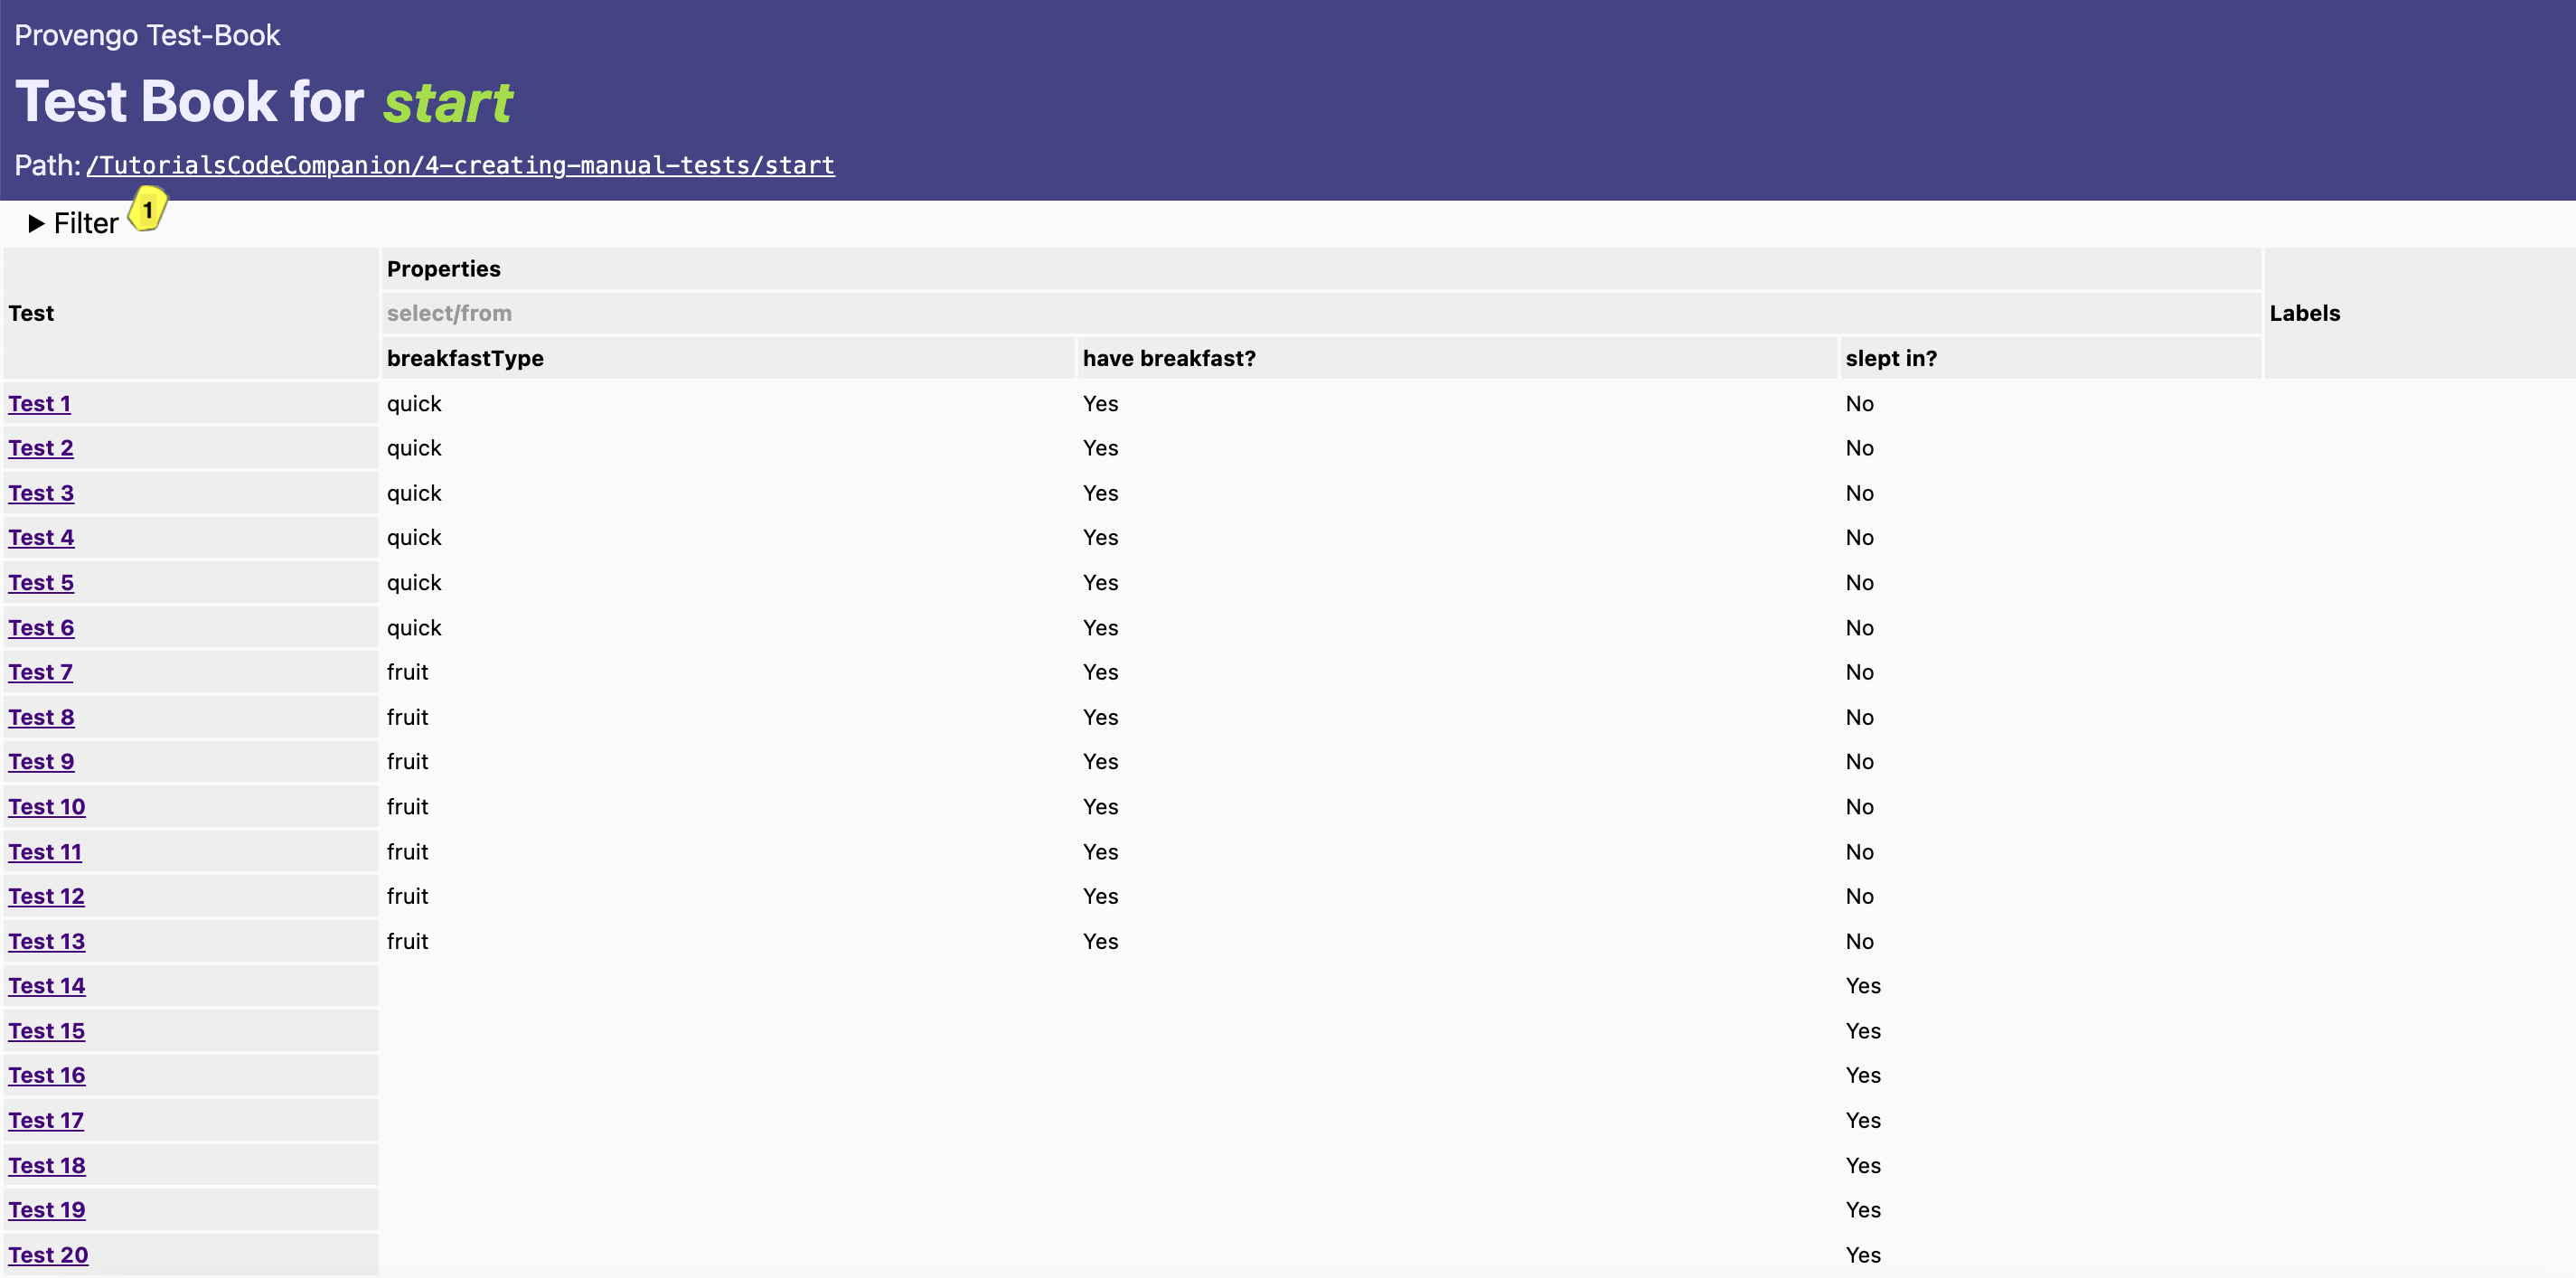
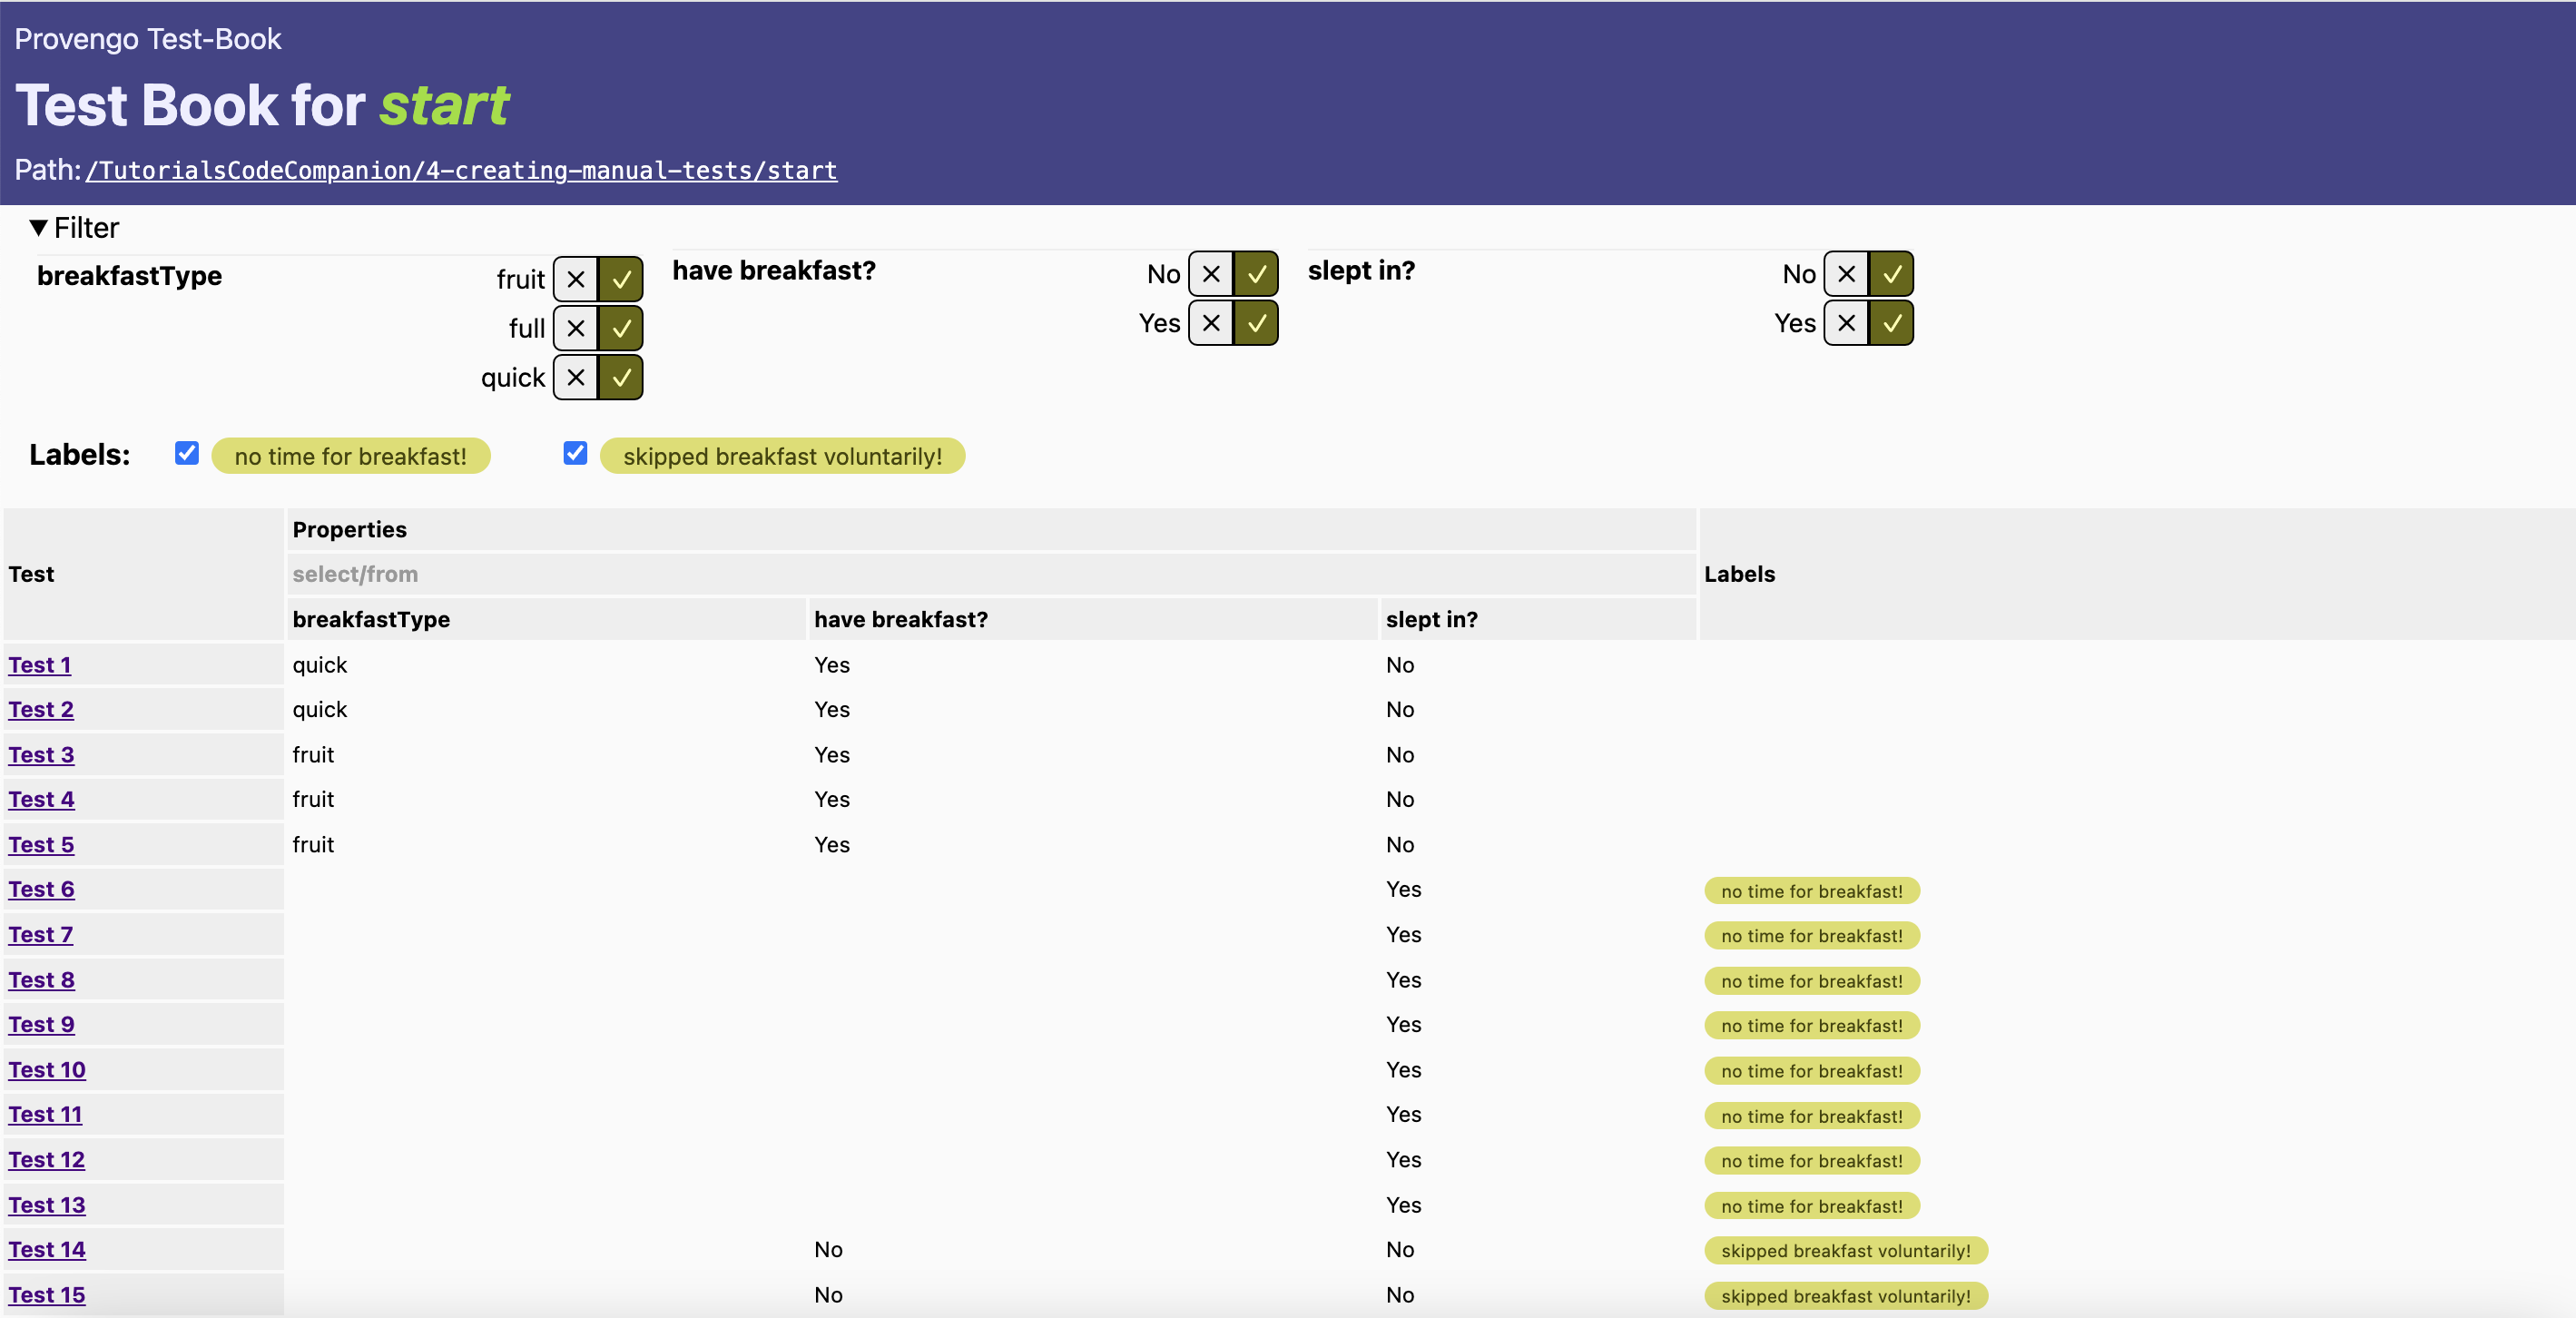
In this test book index page, we can see that a row was created for each test scenario in the ensemble.json file. We can also see properties and their values for each scenario. Click on the filter (marked as 1) to expand the list of properties you can filter by. These are tags created using GenBook.autoTag(event); inside the documentEvent() function.
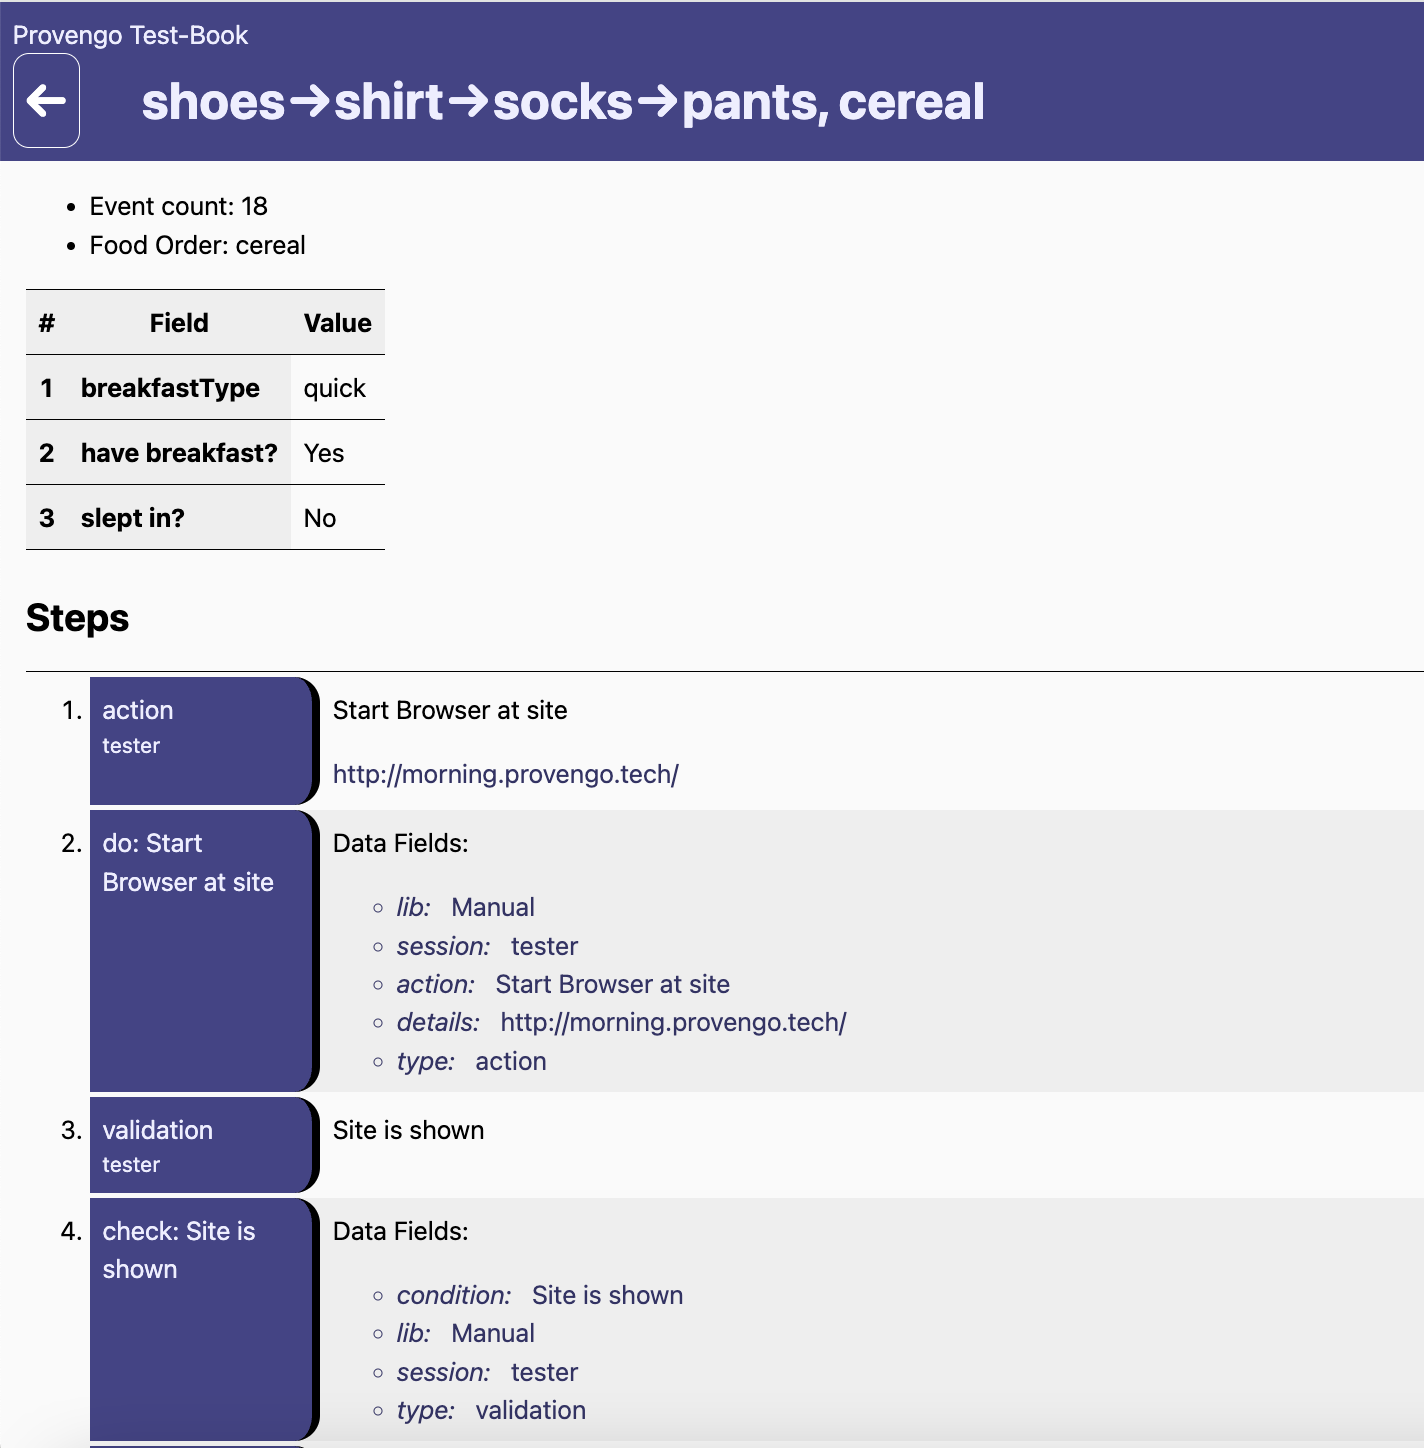
Choose one of the test scenarios and click on it to see how a single test page looks like.
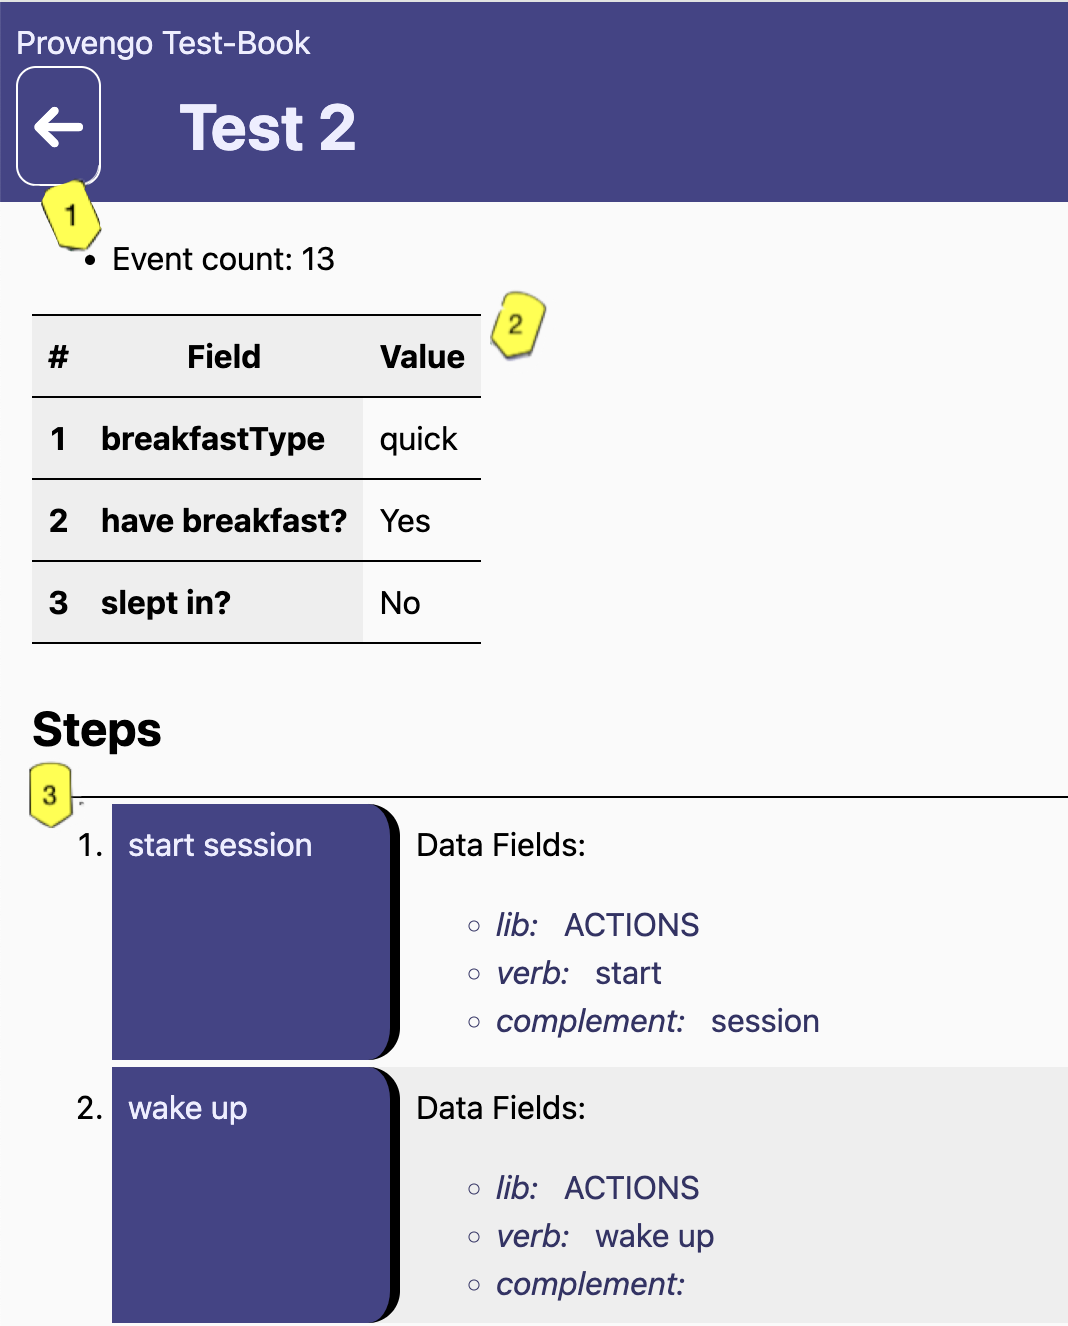
In this example, as each event gets translated into one step in the book, the total events count also equals to the number of steps in the scenario (marked as 1). We can see some meta-data about the scenario (marked as 2). This data is the same as the properties from the index page. You can also find a detailed description of the sequence of steps in that scenario (marked as 3. Only shows the 2 first steps). The sequence currently only has steps from the Actions or the bp-base libs that were generated by the default code. Let’s see how we can refine it with manual instructions.
To generate a test book in an excel format, use the flag --f xls-qc when running the gen-book sub-command. You can then easily import it to 3rd party systems.
|
Adding a Manual Layer
Next, we’ll add a layer of manual instructions to this model, so that each Action library event is followed by a sequence of manual testing instruction events. To do so, we’ll create behaviors that add manual instructions to our model, and a library that lists manual actions.
Keep every layer of the model in a separate file so that changing refinement layers is as easy as dragging the files in and out of the spec/js directory.
|
The manual-layer.js file should contain functions that refine our model with manual details, in a similar way to the automation layer. Since the manual refinements are very similar to those of automation, we can use the refine() function from the automation-layer.js we created in the automation tutorial.
We could just copy it into the manual-layer.js file and have a refine function for each layer, but, that would be duplicating code, which is bad. So in order to not duplicate code, we will put it to a separate file and have both layers use this file.
Since refine() is not a direct part of the specification (the specification does use it but the function itself is not a system behavior) it makes sense to put the new file in the lib directory.
Create a new file called refine.js inside the lib directory. Cut the refine function from the automations-layer and paste it in the new file.
| It is always better to have descriptive parameter names. Let’s make "automationActions" more general and call it "actions", since after the change it can contain manual actions too. |
lib/refine.jsfunction refine(actionEvent, actions) {
on( actionEvent, function() {
block(Actions.any, actions);
});
}Now, let’s see how to use it to add manual instructions to the actions in the model. Open the main-story.js file and see which of the used actions you want to refine with manual instructions. Then, for each of them, call refine. Pass the action as the first argument, and your manual instructions in the second parameter, enclosed in a function.
| Don’t forget you have the full solution project. You can use it as a reference when coding the manual refinements. |
Let’s see an example of refining the start and the wakeUp actions.
manual-layer.js fileconst session = Manual.defineUser("tester"); (1)
refine( Actions.start, function(){ (2)
session.doAct("Start Browser at site",URL);
session.doValidate("Site is shown");
});
refine( Actions.wakeUp, function(){ (3)
session.doAct("Click the Wake Up button", null, "Both eyes should be opened.");
session.doNote("The eyes should be opened for 5 seconds.");
});| 1 | Create a new manual session using the Manual library. |
| 2 | Usage example of the refine function. Calls refine on the start action event with a set of manual instructions (doAct, doValidate). The refine adds the manual actions set to the start action event. |
| 3 | Another refine usage example - for the wakeUp action. |
In the code above we’re using the Manual Library. The entry point for this library is the Manual object, which provides access to events and methods for specifying manual actions. It works similarly to the Actions object we saw in the automations layer tutorial.
Head over to the lib directory, and open Manual.js.
Manual Library - Excerptconst Manual = (function(){ (1)
const __LIB_SIG__ = "Manual"; (2)
function evt(title, eventType, session) { (3)
return Event(title, {lib:__LIB_SIG__, type:eventType, session:session});
}
function makeSession(name) { (4)
return {
noteEvent: function(text, details){ return noteEvent(name, text, details); },
doNote: function(text, details){ return doNote(name, text, details); },
actionEvent: function(action, details, validation){ return actionEvent(name, action, details, validation); },
doAct: function(action, details, validation){ return doAction(name, action, details, validation); },
validationEvent: function(condition, details){ return validationEvent(name, condition, details); },
doValidate: function(condition, details){ return doValidate(name, condition, details); },
any: EventSet(`any ${name} event`, function(e){
return (allEvents.contains(e) && e.data.session === name);
})
};
}
// (... more functions ...)
return { (5)
defineUser: makeSession,
any: allEvents,
addTestBookStep: addTestBookStep,
};
})();| 1 | Definition of the Manual library object. |
| 2 | Library signature used by the library’s events. |
| 3 | All the Manual library events are generated using this function. It takes a title, an eventType and a session name. It then generates an event that contains them in a structured way, and marks the event as belonging to the library by adding a library signature to it. |
| 4 | Definition of makeSession() which is returned from the function defineUser. |
| 5 | The functions that are exposed by the library for external use. |
What actually triggers the evt() to creating events is one of three types that makeSession() function provides us with:
doAct-
Describes a tester’s action - e.g "click on the wear shirt btn".
doValidate-
Describes the need for the tester’s validation - e.g "Validate that the banana disappears after 5 seconds."
doNote-
Describe additional information for the tester - e.g "The eyes should be opened for 5 seconds."
When adding a manual event to the model, we first call one of the above functions, which in turn calls the respective type-event function to request an event.
For example, let’s take a look at the doNote function (The others works in a similar manner).
lib/Manual.js filefunction doNote(session, text, details){ (1)
return request(noteEvent(session, text, details));
}
function noteEvent(session, text, details) { (2)
let e = evt("note: " + text, "note", session);
e.data.text = text;
if ( details ) {
e.data.details = details;
}
return e;
}| 1 | When adding a note event to the model we first call doNote which in turn calls the noteEvent function. |
| 2 | This creates a new event using the evt() function and passing the note parameters to the event. |
Write all your refinements in the manual-layer.js file and when you’re done - you’re ready to create your first test book.
Currently the samples and ensemble files from the previous run are still present in the project under the products\run-source folder. To see the changes added to the model, you should do one of the following before generating the new book: either delete those files or run the sample command with the --overwrite flag (already configured in provengo.yml).
|
Type provengo gen-book <path-to-project> to see the new test-book with the manual instructions added. Then, choose one of the tests and open it.
We’ve added a call to Manual.addTestBookStep(event) from the documentEvent() function in the book-writer.js file so that it generates the steps of the manual library.
|
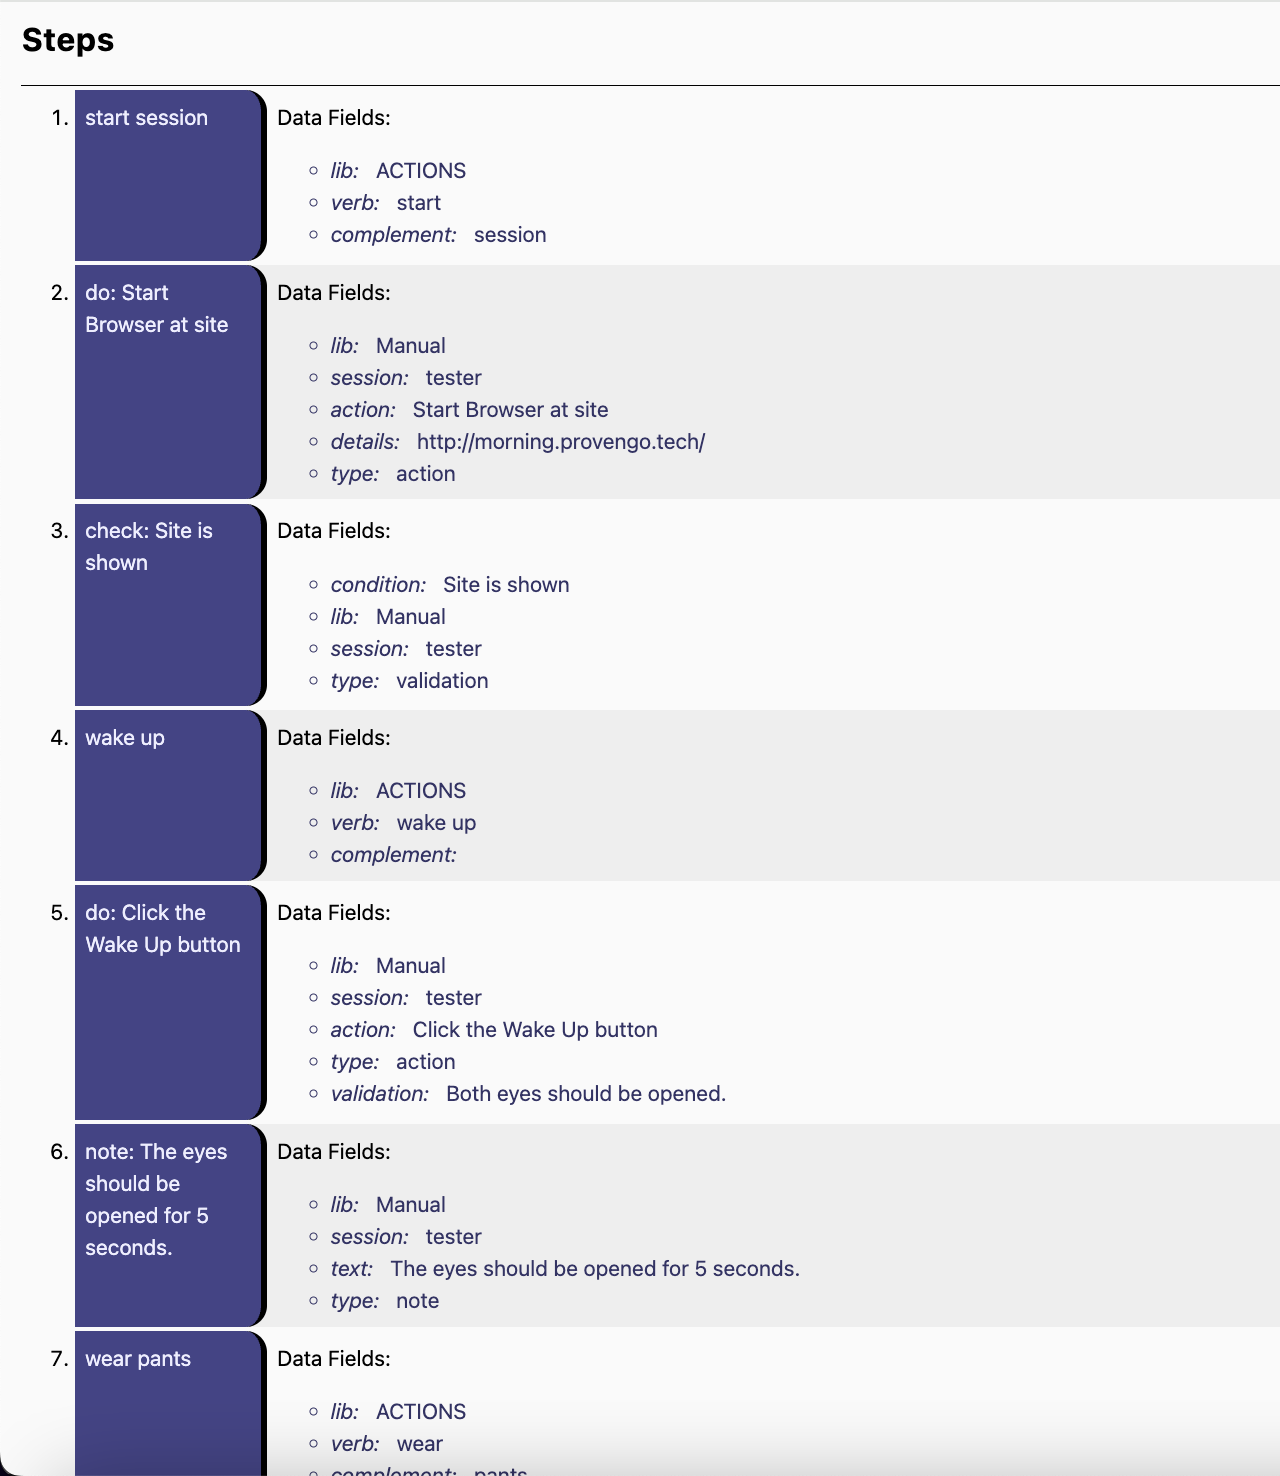
In this run page we can see that every action event is followed by manual instructions. Instead of start session, wake up, wear socks, etc.. as we saw in <Figure 2>, we now first have the start function which is followed by instructions to the tester describing how to start the test session. Note the usage of doAct and doNote in steps 5 and 6.
Adding Content to Manual Tests
So far, we’ve seen how to generate a test book with some manual level instructions. In this section we’ll see how to add various data to the test book, such as tags, lables and scenario titles.
In this section we’ll edit only user-code files, and leave the model itself unchanged. Therefore, it is not necessary to re-sample the model - you can use the gen-book sub command directly, without calling sample beforehand.
|
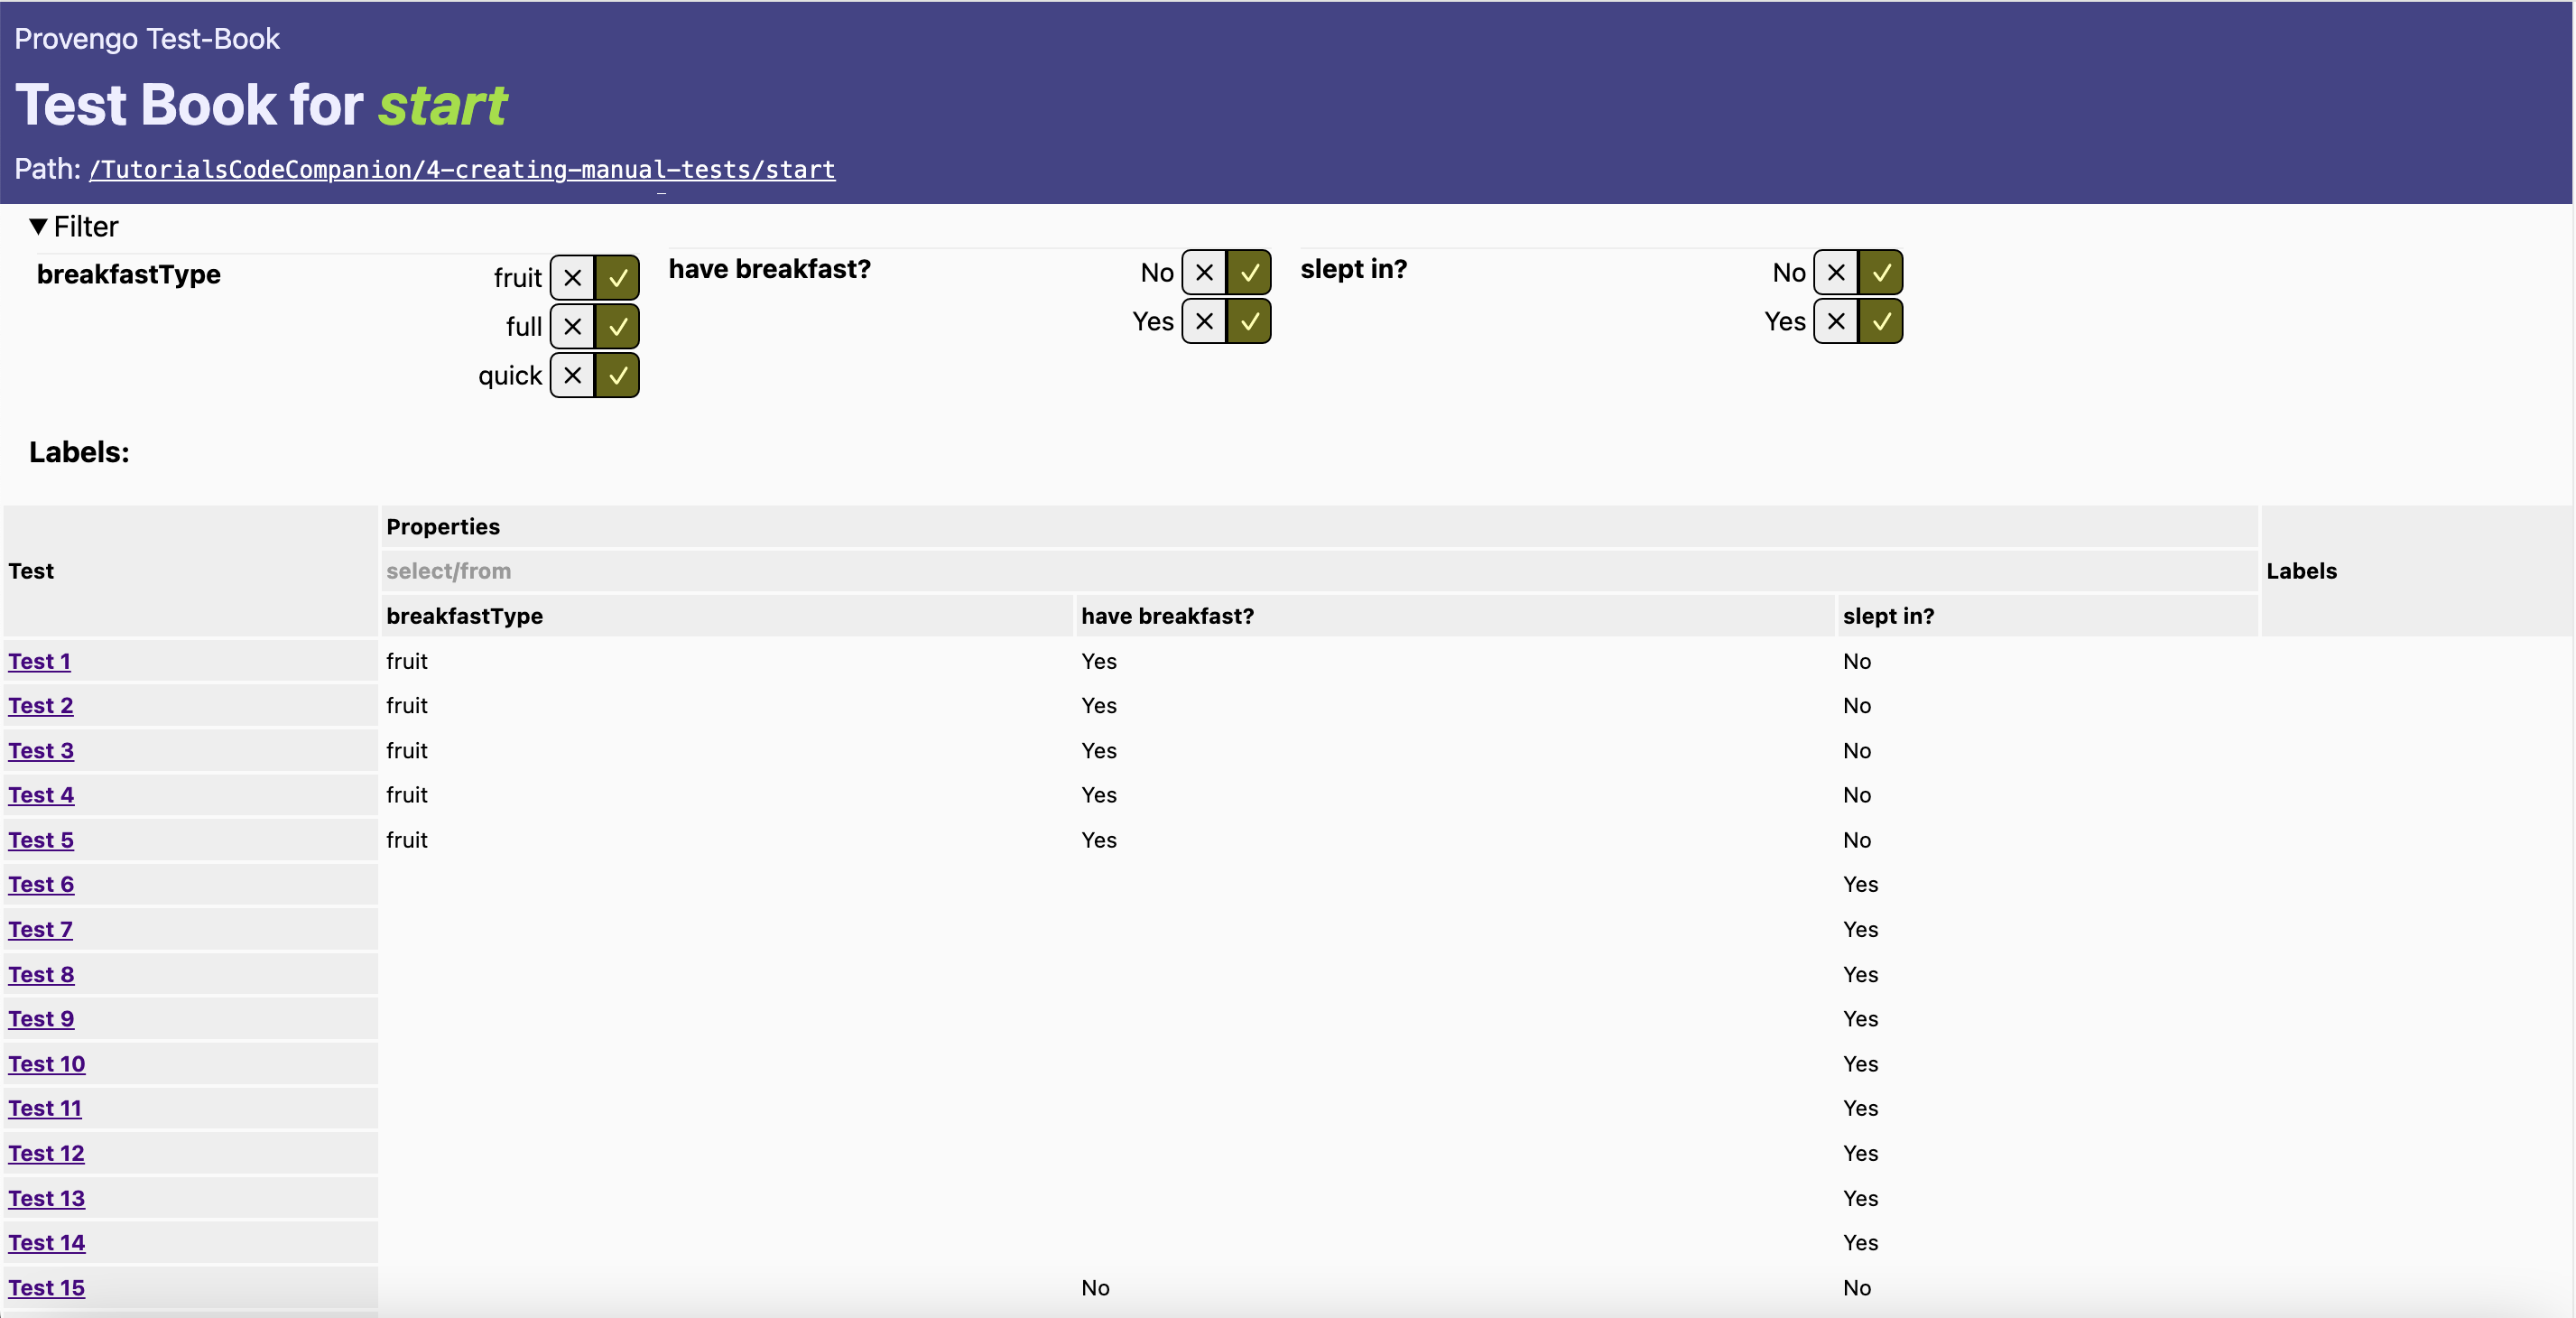
There are two kinds of tags we can add to scenarios. The first kind is a named tag. We’ve already seen those earlier, you can find them when you open the filter section at the index page of the test book (see Figure 4). The second kind is a value-only tag. It has round corners and also appears inside the filter section, next to the "Labels" header. A label also appears at the right column of the index page table, for each scenario. Tags can also be used to filter scenarios at the index page of the test book. To do so, toggle the X, V buttons in the filter section.
Next, Head over to the meta-spec/book-writer.js file. This file handles the book creation and it was automatically generated when creating a provengo project using the create sub-command. It contains some starter user code you can edit to modify your test book.
The documentEvent() function is being invoked by provengo for each of the scenario events (in order). And TEST_SCENARIO is the manual test scenario currently being built.
Find a call to GenBook.autoTag(event); This line of code is what created the existing tags.
Adding Labels and Tags
Let’s say we would like to label the scenarios where the breakfast was skipped according to the reason. When the scenario includes the event of "slept-in", we know the breakfast is skipped because there was no time. Another case is when the answer to maybe("have breakfast?") from the main-story is false.
Let’s see how we can add labels (AKA value-only tags) using TEST_SCENARIO.addTag(value) to these two cases.
Add the (marked between comments) code below. Then run the gen-book sub-command to see the labels that were added.
function documentEvent( event ) {

    GenBook.autoTag(event);  (1)

    const d = event.data;
    if ( d ) { (2)
    // Code to add - start
        if(d.name === "have breakfast?"){ (3)
            if(!d.value){ (4)
                TEST_SCENARIO.addTag("skipped breakfast voluntarily!") (5)
            }
        }
        if(d.name === "slept in?"){ (6)
            if(d.value){ (7)
                TEST_SCENARIO.addTag("no time for breakfast!") (8)
            }
        }
    // Code to add - end

    // .... code continues
    }
}| 1 | Generates tags based on Combi and Choice events. |
| 2 | event.data is an optional field so we need to first check for its existence. |
| 3 | When d.name equals "have breakfast?", we’ll check whether the value is false to indicate that the breakfast was skipped. |
| 4 | Adds the value-only tag to the scenario. |
| 5 | When d.name equals "slept in?", we’ll check whether the value is true to indicate that the breakfast was skipped. |
| 6 | Adds the second value-only tag to the scenario. |
|
A more idiomatic way of detecting negative and positive events emitted by the Note the usage of |
Next, We would like to tag the events where there was a request for a new food that is not availble in the current website’s buttons panel.
First, Open the main-story file and under the full breakfast case add a request to the new food action: request(Actions.eatNewFood);
Let’s see how to use the TEST_SCENARIO.addTag(name, value) to add more named-tags.
Open the book-writer file, paste the code below right after the code we’ve added in the previous section, for creating labels.
if(d.verb === "eat"){ (1)
    if(d.complement === ""){ (2)
        TEST_SCENARIO.addTag("new food","yes") (3)
    }
}| 1 | Finds the scenarios where the verb "eat" is in use. |
| 2 | Checks if the value is empty (not equals to banana or cereal). |
| 3 | Adds a tag with the name "new food" and the value "yes" to the manual test scenario currently being build. |
Adding Titles and Metadata
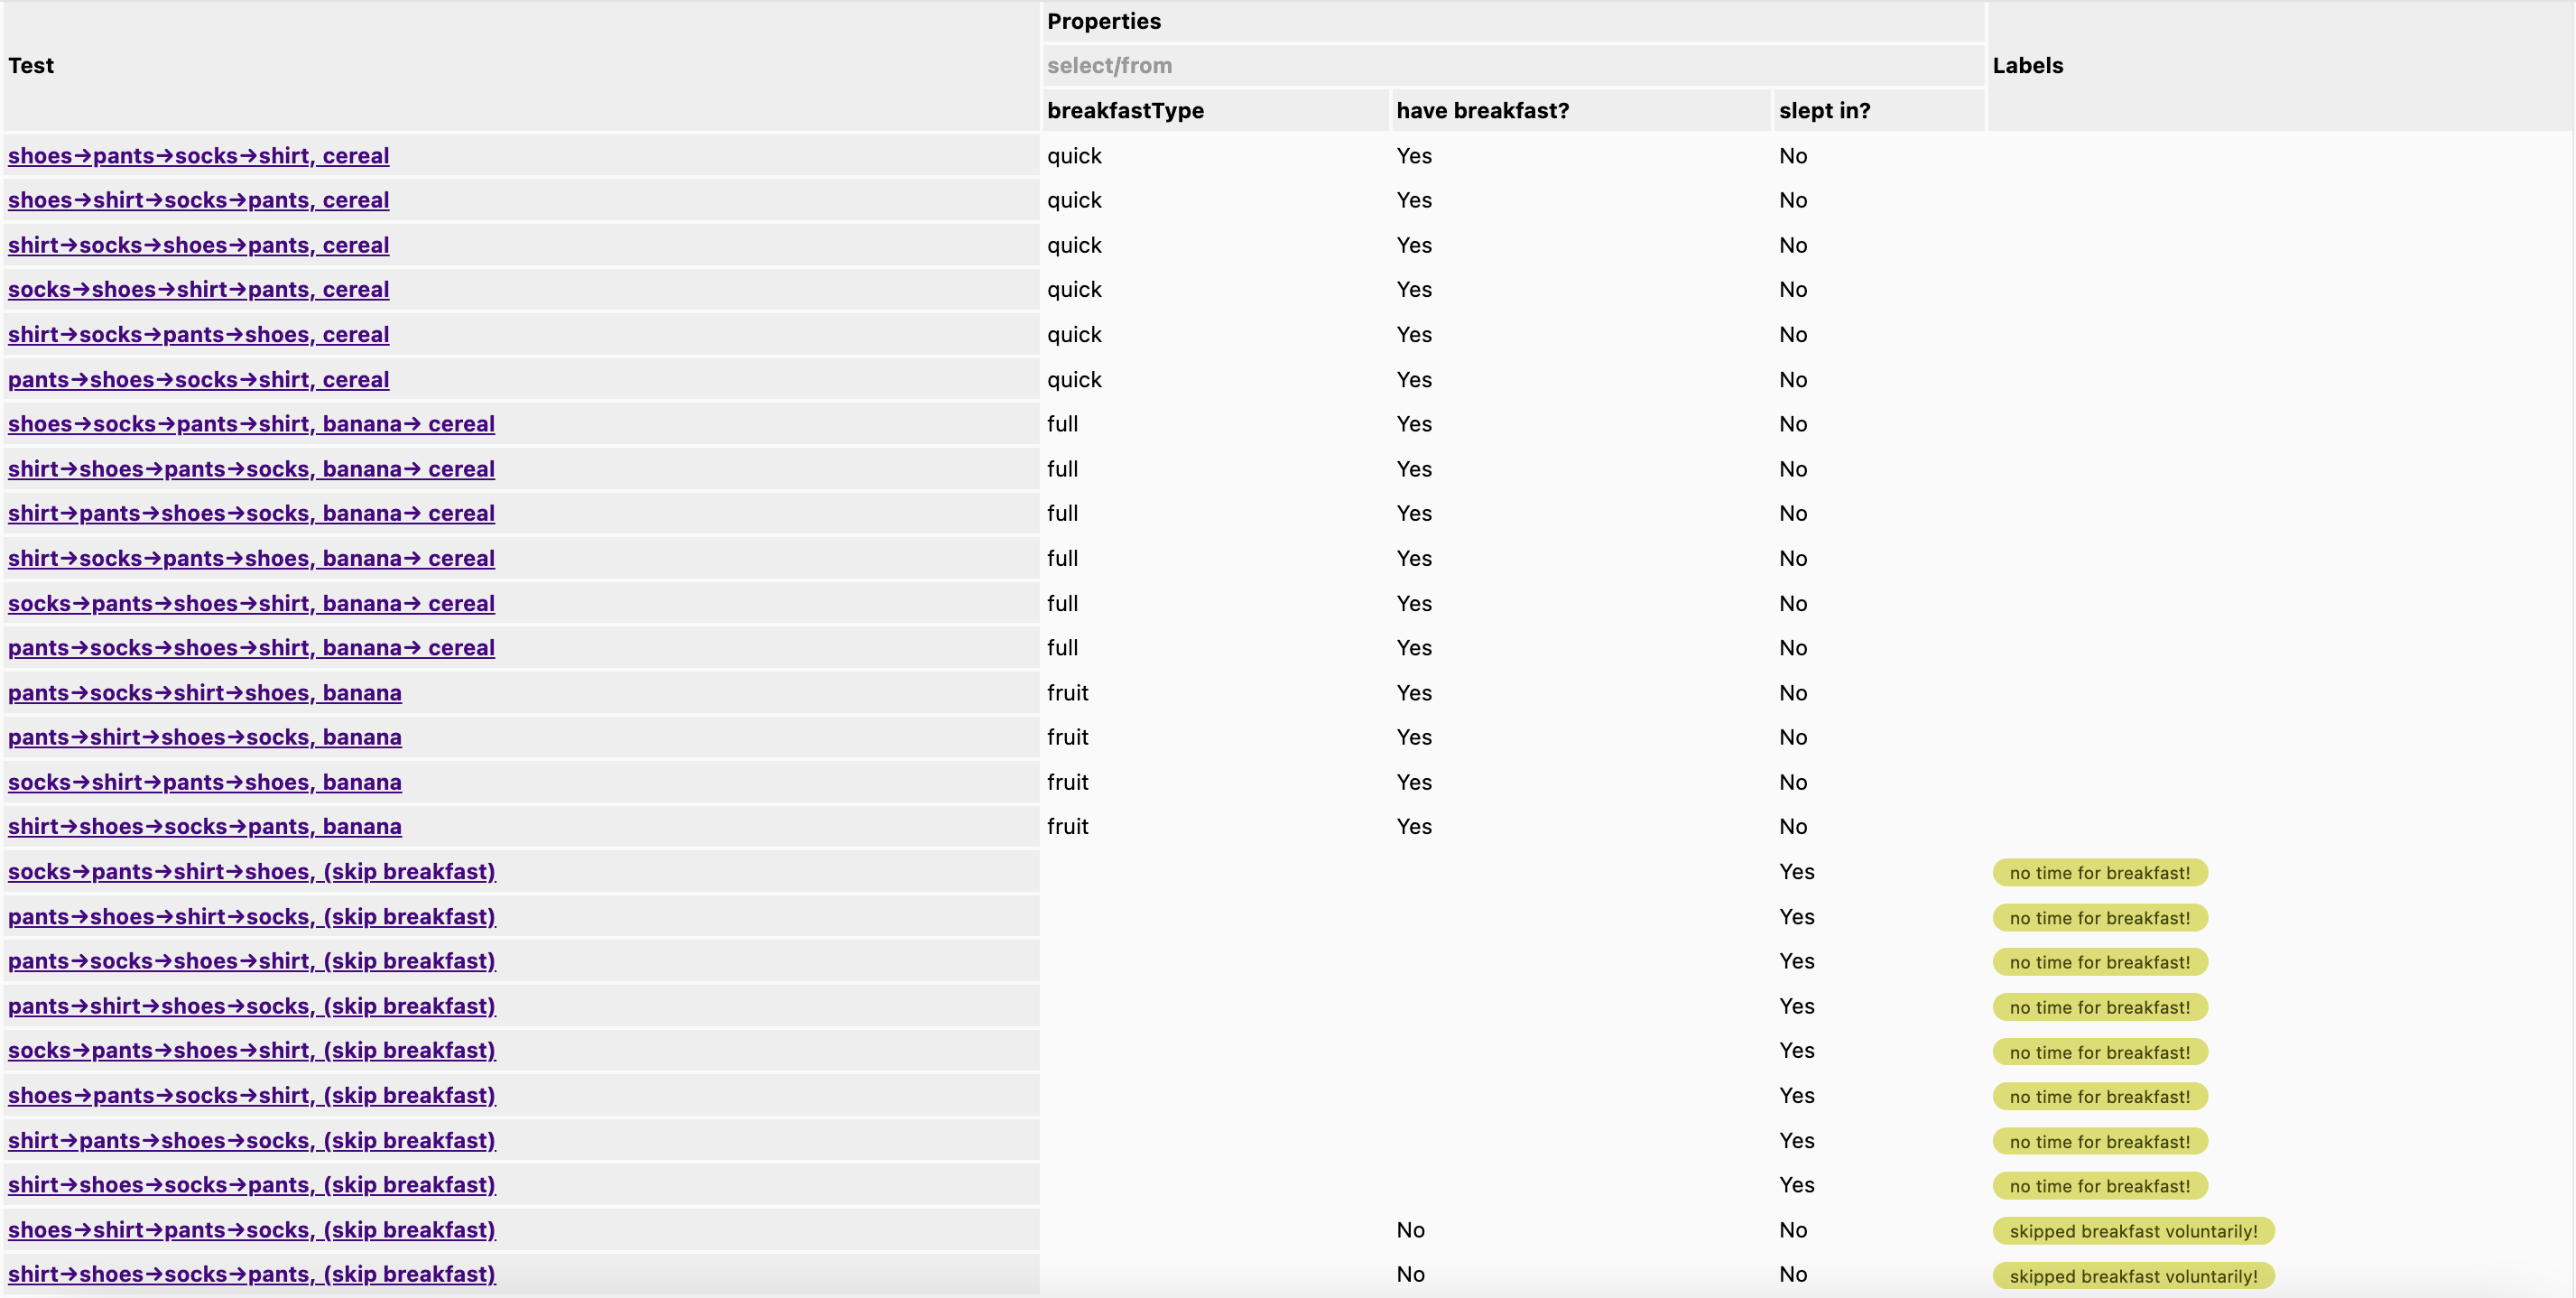
By default, the names of the tests in the manual test book get their title by the number of the scenario. We can modify the titles to be more descriptive. For example, let’s create a title that describes the order of getting dressed and the order of eating the food (if at all).
First, let’s add some code that will save the order of the events for dressing up and eating.
Find the startTrace() function at the beginning of the file and initialize two arrays to hold the cloths and the food order respectively.
function startTrace() {
    count=0;
    clothsOrder = [];
    foodOrder = [];
}
Next, add another block of code inside the documentEvent() function. You can put it right above the code we’ve added to create tags. This will check if the event verb is either "eat" or "wear" to push it into the arrays.
 if ( d ) {
    if ( Actions.any.contains(event) ) {
        if ( d.verb === "wear" ) {
            clothsOrder.push(d.complement);
        } else if ( event.data.verb === "eat" ) {
            foodOrder.push(d.complement);
        }
        return;
    }
    // more code ..
}
We now have two arrays that contain events for the current scenario by order. We need to turn them into a string and set it as a title to the TEST_SCENARIO object. We can also add the events orders to the meta data at the top of the run page for each scenario.
Add the below code inside the endTrace() function.
function endTrace() {
    TEST_SCENARIO.addMetadataLine("Event count: " + count); (1)
    // when the length if more than 1, remove the starting "->"
    let foodClause = foodOrder.length>1? foodOrder.join("→ ").slice(1,):
                     foodOrder.join("→ "); (2)
    // when the length if more than 1, remove the starting ","
    let foodClauseMeta = foodOrder.length>1? "Food Order: " +  foodOrder.join(", ").slice(1,) :
                         "Food Order: "+foodOrder.join(", "); (3)
    if ( foodOrder.length>0) { (4)
        TEST_SCENARIO.addMetadataLine(foodClauseMeta); (5)
        TEST_SCENARIO.setTitle(clothsOrder.join("→") + ", " + foodClause );
    } else { (6)
        TEST_SCENARIO.setTitle(clothsOrder.join("→") + ", " + "(skip breakfast)" );
    }
}| 1 | Adds the number of the events in the scenario to the top of the scenario page. |
| 2 | Creates a string to be used in the title by joining the elements of the foodOrder array with "→ ". |
| 3 | Creates a string to add to the meta data, by joining the elements of the foodOrder array with ", ". And with a header of "Food Order:". |
| 4 | If we have items in the foodOrder array
<.> Adds a line to the metaData.
<.> Sets the title of the scenario. |
| 5 | Otherwise, it means that the breakfast was skipped. |
Now, run the gen-book command again to see the results.
And as usual, open one of the scenarios to see the changes.
Some Improvements to the book
Let’s make the book more fun and readable for the tester by adding some emojis and content to the steps. Open the manual library, and add the object below. We’ll use the type of each event to add an emoji to it’s step.
const TYPE_TO_TITLE = {
        "action":     "🔨 Act",
        "validation": "🔎 Validate",
        "note":       "🗒️ Note"
};
Then, inside the createHtmlBookStep() in lib/Manual.js, change the title variable as below so it converts the type to the title with an emoji.
Let’s also add a note to steps of type doAct. We’ll add a note to it after we check if the event contains a validation field (which is the 3rd argument we pass to the doAct function whenever we call it via the manual-layer file).
function createHtmlBookStep( e ) {
    let evtType = e.data.type;
    let title = `${evtType}<div style='font-size:smaller'>${e.data.session}</div>`; (1)

    let body = "";
    let details = e.data.details || "";

    switch (evtType) { (2)
        case "action": (3)
            body = e.data.action
            if ( e.data.validation ){
                details +=`🔎 Validate: ${e.data.validation}`; (4)
            }
            break;
        case "validation":
            body = e.data.condition;
            break;
        case "note":
            body = e.data.text;
            break;
    }
    return (details.trim().length>0) ? StepElement(title, body, details) : StepElement(title, body);
}| 1 | Changes the title to have an emojy according to the type. |
| 2 | Changes the body and the details of each step according to the type of the event. |
| 3 | When the event is of action type it check for additional details. |
| 4 | Adds the details as a note to the step. |
Generate the book again to see the results.
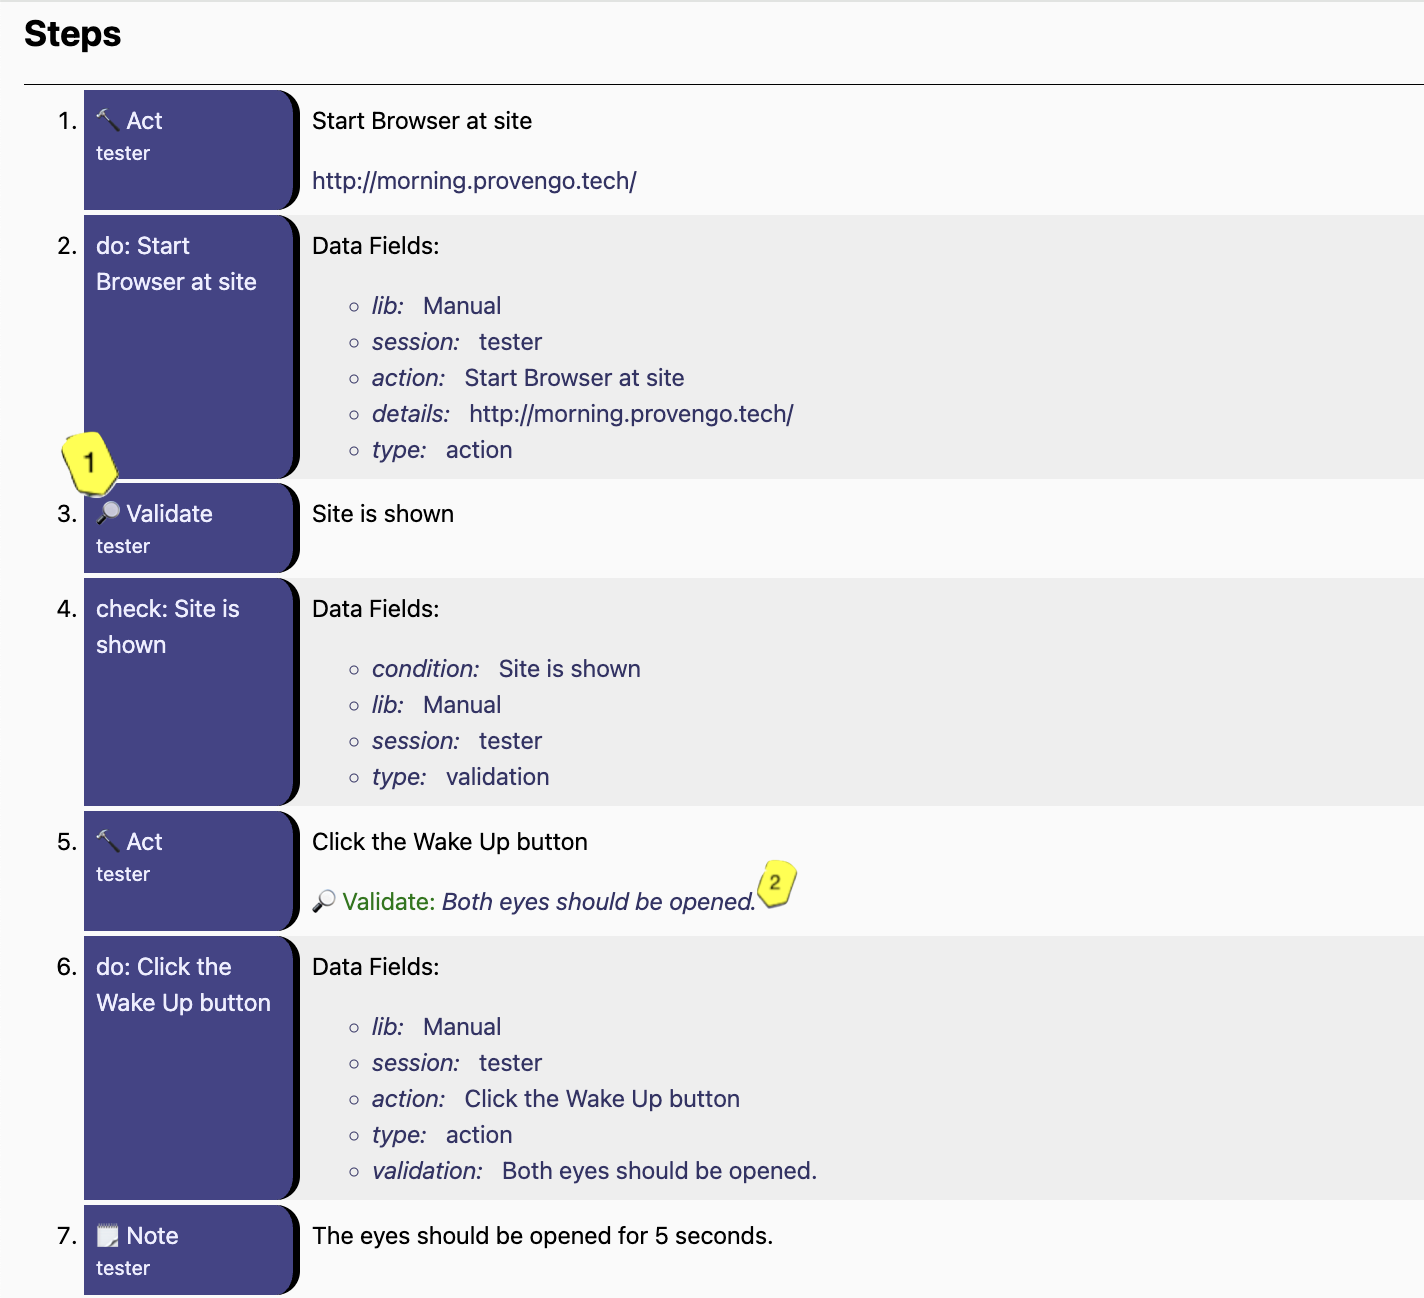
The steps which describe instructions to the tester should have titles with an emoji (2), and when the type is action, the step should also contain a validation note (3).
Events and manual scenario steps can be different things. The documentEvent function may add multiple steps for a single event, or not add any steps at all (effectively hiding the event from the manual tester). It’s up to you do decide how events are translated to manual scenario steps, and to how many of them.
|